Automated testing practices and strategies for GitHub open source Go projects in the cloud native field
introduce
As OpenIM, a popular project on Github, how to create value in the cloud native era is very important. OpenIM is a small and high-quality team, and we do not have particularly in-depth insights in automation.
- Continuous Integration and Continuous Delivery (CI/CD) using GitHub Actions:
- GitHub Actions provides a platform to automatically build and test Go language projects. By configuring GitHub Actions workflows, you can automatically run tests when your code changes, ensuring the quality and functionality of your code (https://docs.github.com/en/actions/automating-builds-and-tests).
- KubeVela project practice:
- KubeVela is a cloud-native and open-source project in Go that shows how to organize CI/CD processes, including automated testing, in a cloud-native environment. KubeVela uses declarative workflows to coordinate the CI/CD process. You can refer to KubeVela’s GitHub repository to understand and apply these [Practice 3](https://www.alibabacloud.com/blog/kubevela-one-of-the- hottest-golang-cloud-native-and-open-source-project_597465)4[5](https://github.com/kubevela/workflow#:~ :text=KubeVela Workflow is an open,engine in your own repository).
- Cloud native testing framework and tools:
- In cloud native development, Contract Testing is a common testing practice, which ensures that communication between services complies with predefined API protocols. For example, Pact is used in Cloud-Native Toolkit for contract testing. By writing and integrating tests, you can verify that communication between services works as expected 6.
- Code Coverage Check:
- When doing automated testing, it is a good practice to check code coverage. Many testing frameworks have built-in code coverage checking capabilities, and they can be configured to report code coverage of tests. For example, use the SonarQube tool to read and report code coverage information 6.
- Utilize open source tools and frameworks:
- You can use open source tools and frameworks for testing, such as using Cypress to test cloud native applications[7](https://dev.to/litmus-chaos/cloud-native-application-testing-automation-2bh5#: ~:text=Cloud Native Application %26 Testing,Testing Using Cypress for). There are other projects and resources, such as the learning-cloud-native-go/myapp repository on GitHub, which provide completed examples of cloud native Go projects. You can refer to these examples to understand and apply cloud native testing practices[8] (https://medium.com/learning-cloud-native-go/lets-get-it-started-dc4634ef03b#:~:text=The completed project can be,The completed API).
- Customized automated testing process:
- By combining GitHub Actions and open source tools, you can customize your project’s CI/CD process, including automated testing and verification steps9.
Quantify the value of automated testing
Automation obviously means that the manual cost in the later period is very low. That is to say, as time goes by and the number of automation runs increases, the value of automation and ROI becomes higher.
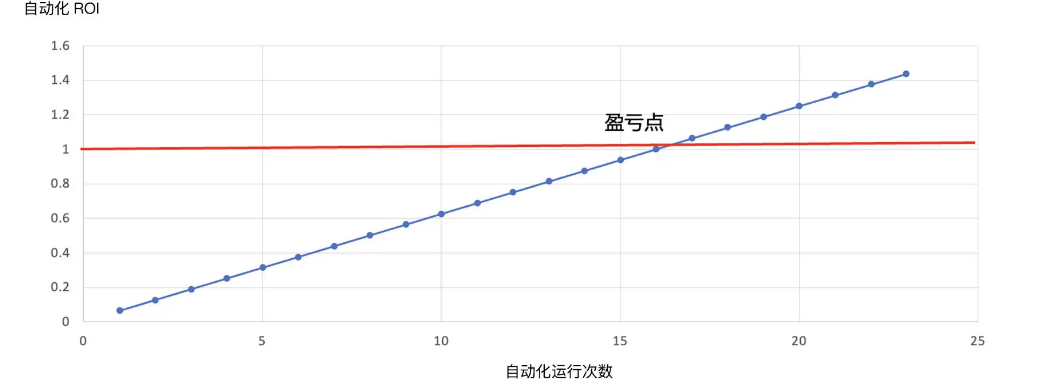
In addition to development costs, there are also maintenance costs. After the automated test is developed, it still needs to maintain version upgrades, diagnose errors, optimize the structure, etc. This cost requires continuous investment.
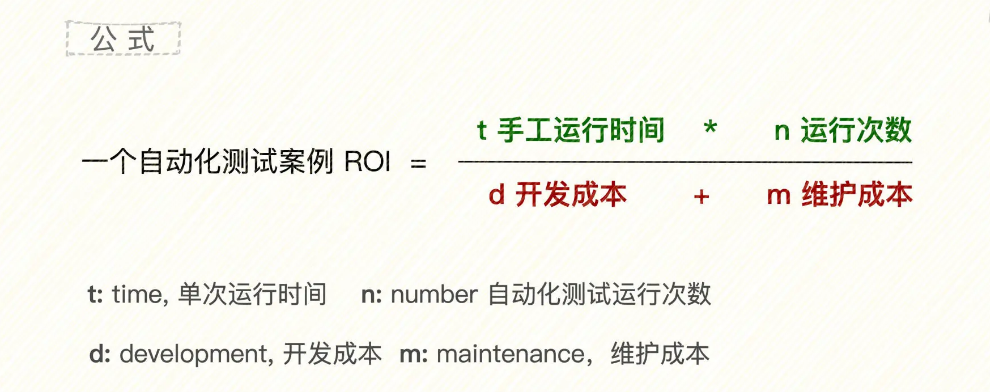
Therefore, the formula is as follows:
Output/Input = 0.5*N/(8+maintenance cost)
If the ROI is greater than 1, it means a profit, and if it is less than 1, it means a loss. Then, given a test case, whether to automate it should be judged based on the fact that the expected ROI (automated testing) must be at least greater than 1.
Automated testing is a long-term revenue model. Ideally, it is a one-time investment (the investment is the development cost), and each time it is run, the output will be increased. Therefore, the longer the time and the more times you do it, the greater the returns you will receive.
Regarding development costs (including development costs d and maintenance costs m), similar to estimating software development workload, the line of code method and function point method can also be introduced into estimating development workload, which is easier to grasp. But maintenance costs are a bit fuzzy. They include a variety of variable factors and are the main source of risk in automated testing projects.
Automated testing is used for regression testing
Regression Testing is a type of software testing. Its purpose is to verify whether existing functions still work properly after modifications are made to the software (such as fixing bugs, adding new features, or refactoring code). It can help ensure that recent code changes do not break or affect existing functionality.
In GitHub projects, regression testing and PR processes can work together, for example:
- During the PR process, when developers submit a new PR, GitHub Actions can be configured to automatically trigger regression testing and execute the test suite to verify the impact of code changes.
- The results of regression testing can be used as part of PR reviews to help team members assess the quality and impact of code changes. If regression tests fail, you may need to fix the code and run the tests again until all tests pass.
- Once all regression tests pass and the code is approved by team members, the PR can be merged into the master branch.
The beginning of automated testing
In practice, smoke testing is the start of your automation
Smoke testing is usually the first round of testing after software is built or released to a test environment. It is mainly about ensuring that the basic functionality of the software is working properly, rather than in-depth testing on the details. The main goals of smoke testing are:
- Identify whether there are serious issues that prevent basic functionality of the software from operating.
- Ensure the software is “healthy” at a basic level and ready for further testing.
Smoke tests typically cover:
- Basic testing of core functionality, such as whether the software starts and runs properly.
- Whether the main interfaces and interactions work properly.
- Any other fundamental issues considered “disruptive”.
In practice, it is possible to set the goal that smoke testing is 100% automated. At this time, automated testing can be combined with manual testing to form a simple pipeline of new version release + smoke testing.
Optimal automation implementation section
Develop a strategy to achieve the greatest possible ROI from this automated test design.
We know that the different stages, testing time and testing frequency are different.
Test ROI Pyramid
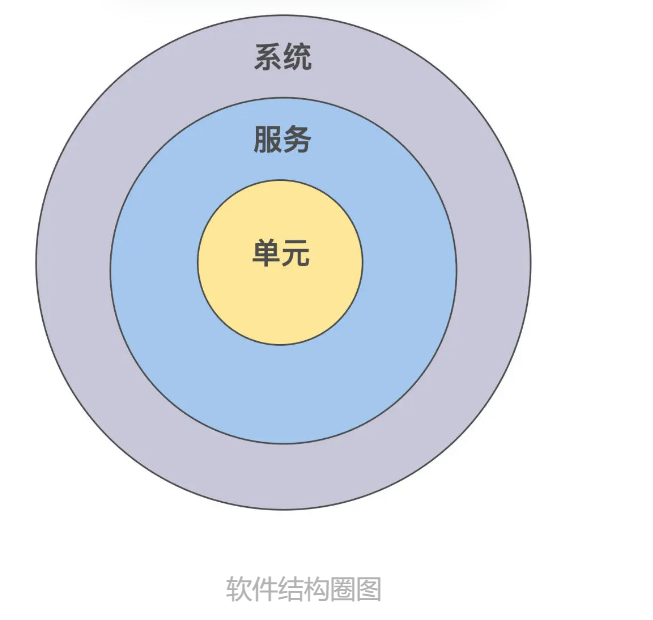
In the world of test design, an often mentioned approach is layering. Specifically, given a system, the structure is divided into three levels. The unit is in the smallest circle; the service contains multiple units, which is in the middle circle; and the system contains multiple services, which is the outer largest circle. The structure diagram is as follows:
In practice, how should these three tests be combined and arranged? Mike Cohen first proposed the testing pyramid model in 2009 in his new book, How to Succeed with Agile. Unit test automation is at the bottom of the pyramid, interface test automation is in the middle, and UI test automation is at the top of the pyramid.
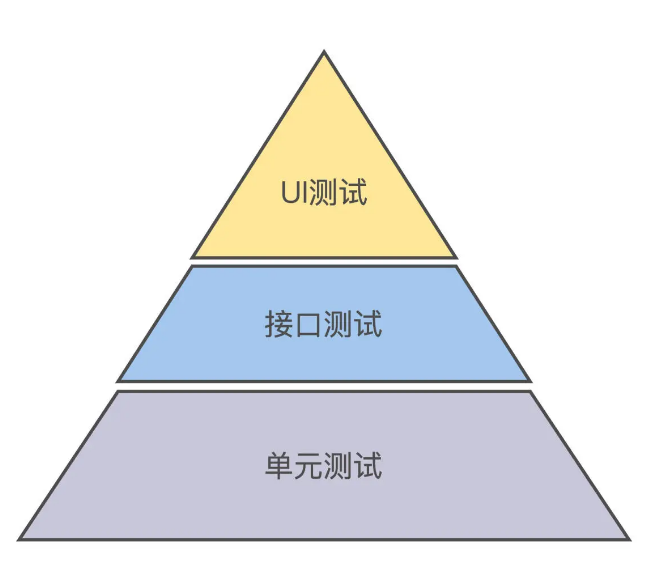
Why a pyramid? If you don’t understand the “why” behind the law, you won’t be able to use the law well. In the previous lecture, we learned that “ROI is actually the implicit lifeblood of automated testing.” Now we will use ROI thinking to analyze the testing pyramid law.
Below, we look at the ROI of each layer separately. Unit tests can be triggered and run every time the developer commits code, and the regression frequency is high; interface tests are run in every round of integration testing, and the regression frequency is medium; UI automation tests are run in user acceptance testing, and the regression frequency is low.
According to the ROI model, we can get the ROI ranking of 3 types of automated tests, as shown in the following table:
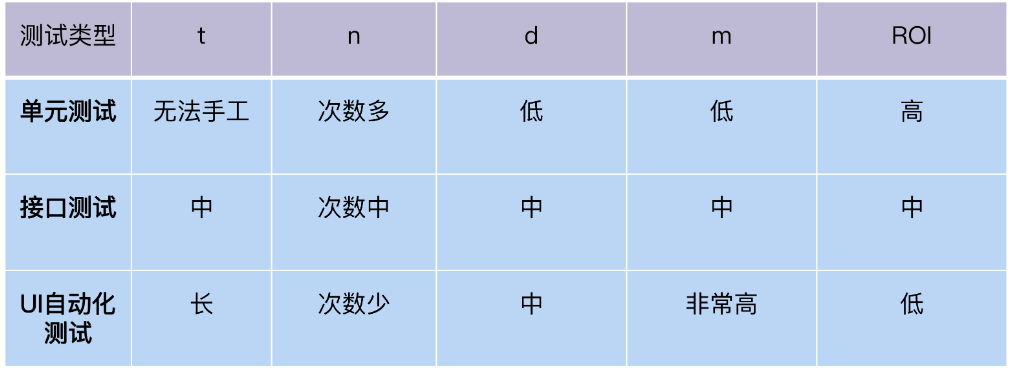
It is not difficult to find by comparing the testing pyramid. In fact, the ROI of the three types of automated testing is from high to low from bottom to top.
Then, we should first invest in unit testing with the highest ROI, then do interface testing in ROI, and finally complete UI testing.
Why does layered testing become “involuted”?
Among layered tests, what we need to write the most are unit tests:
package main

import (
"testing"
)

func TestValidateCredentials(t *testing.T) {
     valid := validateCredentials("username", "password")
     if !valid {
         t.Errorf("expected valid credentials")
     }
}
Interface test:
Interface testing mainly targets the API interface of the application. We may have an API endpoint to handle login requests.
package tests

import (
"net/http"
"testing"
)

func TestLoginEndpoint(t *testing.T) {
     resp, err := http.Post("/login", "application/json", strings.NewReader(`{"username":"username","password":"password"}`))
     if err != nil {
         t.Fatalf("could not send request: %v", err)
     }
     if resp.StatusCode != http.StatusOK {
         t.Errorf("unexpected status: got (%v) want (%v)", resp.StatusCode, http.StatusOK)
     }
}
End-to-end Testing (E2E Testing):
End-to-end testing validates the workflow of the entire system. We can use tools such as Selenium to simulate the user’s login process.
// Use Selenium or similar tool for end-to-end testing
Selenium is a powerful tool for controlling web browsers to perform automated testing through programs. It supports multiple browsers, including Chrome, Firefox, IE and Safari. With Selenium, testers can write scripts to simulate user interactions, verify the application’s behavior, and ensure the application works as expected. Following are some of the main features and components of Selenium
UI Testing UI testing mainly targets the user interface of the application. We can also use Selenium or other tools to simulate user interactions and verify the UI elements of the login page.
// Use Selenium or similar tools for UI testing
It can be seen that a request is initiated from the browser page, enters the API gateway, and is then passed to the Login function in the service. It has passed three test sections: UI test, API test and unit test.
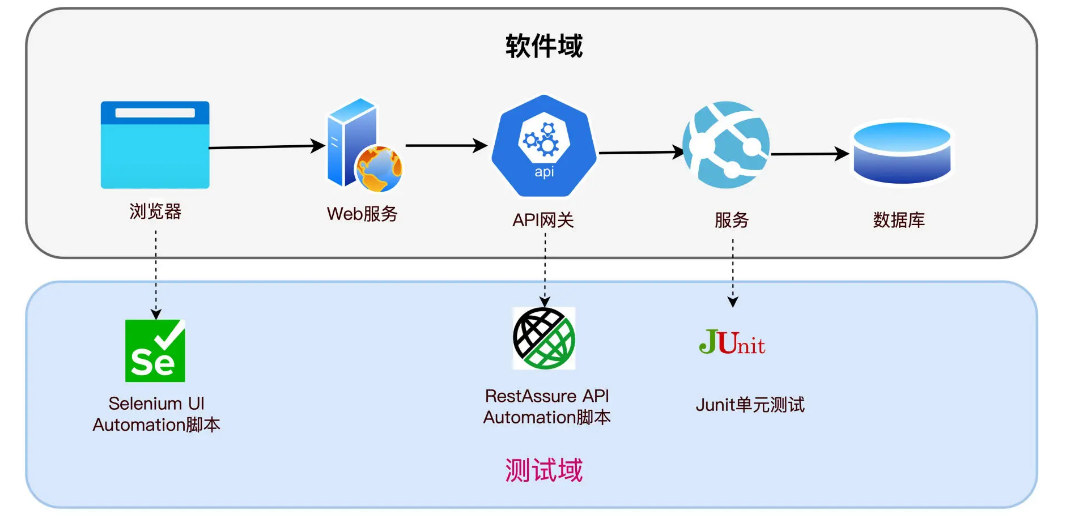
The three test sections measure the form of a request at different levels, so each section can test all cases or part of the cases. Just like three people responsible for a project, if there is no prior coordination and arrangement, the three people may do the same thing, causing waste, or there may be one thing that none of the three people do, forming a testing blind spot.
Requirements/Strategy Matrix
Let’s first take a look at what the test requirements are and use the FURPS model to sort out the requirements. FURPS uses 5 dimensions to describe the functional requirements of a software. The word FURPS corresponds to the English initials of each requirement:
- F=Function function
- U=Usability
- R=Reliability
- P=Performance performance
- S=Supportability
Select tool framework
Tool selection is very important, whether you are a reviewer or a solution proposer in a large enterprise. However, a common scenario is that the solution proposer talks about how excellent and powerful the new tool A is, covering everything from problem analysis to solution solutions. But not all experts attending the meeting are familiar with this new tool, and they will ask a lot of questions like “Why don’t you use tool B?”

Through this model, we get an important conclusion: the development workload of an automated test case, under given conditions, how long does it take for an engineer with any experience to use what tools, and how long does it take to complete, this is a fixed value that can be estimated. However, maintenance workload includes a variety of variable factors, which is the risk of automated testing projects.
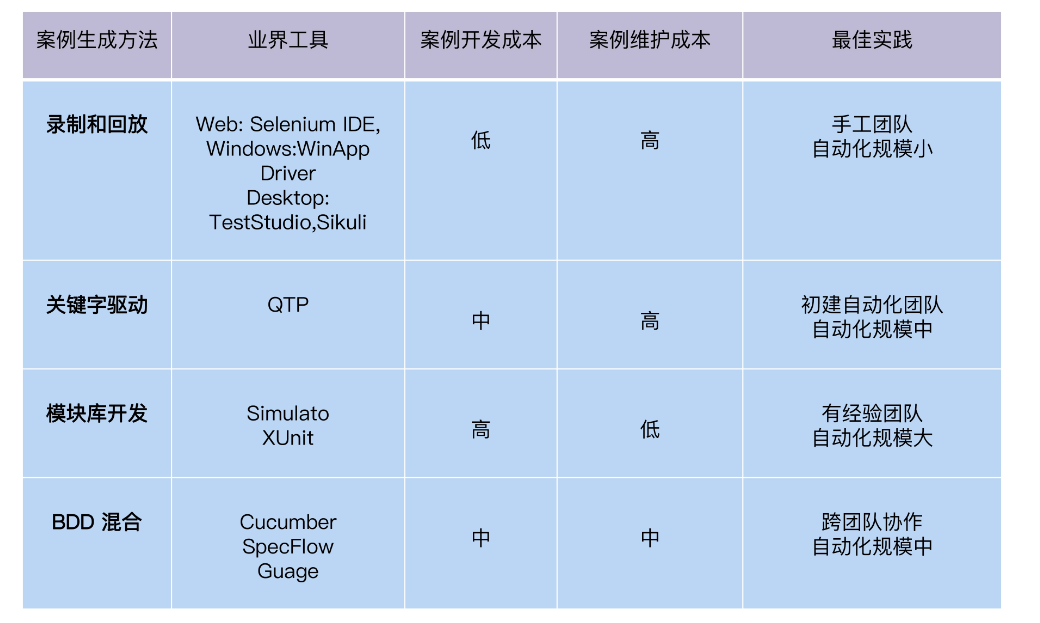
Recording and playback
Most of the first generation of automated testing tools are based on recording and playback. For example, the earliest WinRunner records desktop UI applications. The current representative tool is Selenium IDE.
To generate test code is very simple, open the browser Selenium plug-in, open the test web page, such as http://www.youtube.com and click on the video
This method of generating automated scripts through recording has the advantages of fast speed, zero coding, and low technical requirements for testers. The disadvantage is that once the scale is expanded, the maintenance workload is almost unbearable, such as integration with CICD, customized reports, multi-environment support, etc.
Method 2: Keyword driven
However, the scripts generated by recording and playback are still process-oriented functions, and testers need to have a certain code base to expand and maintain these functions.
So, is there any way to enable people without coding experience to edit and maintain scripts? The keyword-driven approach came into being. It adds the concept of page control objects. The method of calling an object is to operate the object. Under this mechanism, the object, object behavior, input data and description information can be Presented in the form of a table. Business personnel only need to edit the table to modify the running logic. This is called keyword drive.
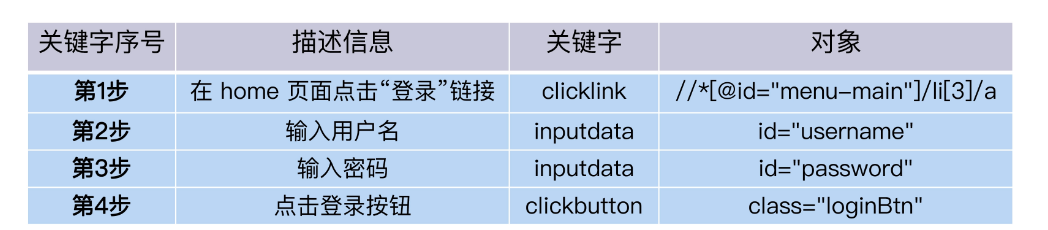
Compared with recording and playback, the advantage of the keyword-driven framework is that it reduces the technical requirements for test developers. Moreover, test developers have more logical control over the code, such as adding loop structures, wait time, and log output, as long as the framework provides sufficient keywords.
But it is not difficult to see that the people who edit the table and the people who maintain the keyword warehouse are not the same people. The former are testers who understand the business, and the latter are developers with strong technical capabilities. This will make development and maintenance more difficult.
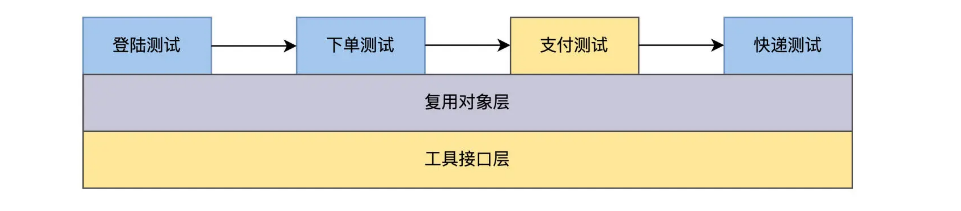
Method 3: Module library development
With the development of software technology, the technical level of automated testers is also improving, and the problems to be solved are becoming more complex. For example, how can the code of automated testing be effectively reused, whether it has good scalability, etc. This expansion capability is two-dimensional and is divided into horizontal function expansion and vertical level expansion.
Horizontal function expansion refers to the increase in test functions. The automated test code draws on the module design thinking of the software. The test scenario of an application can be divided into multiple functional modules. For example, the food ordering process can be divided into a login module, an order module, and a courier module. The modules are connected through calling relationships to form a test scenario.

At the technical level, it can be divided vertically into functional case libraries and general libraries. For example, the components of the page can form a reuse library, page object, button object, link object, etc. The technical layer coupled with the development technology is encapsulated in the reuse library, and the business functions related to testing are implemented in the function case library.
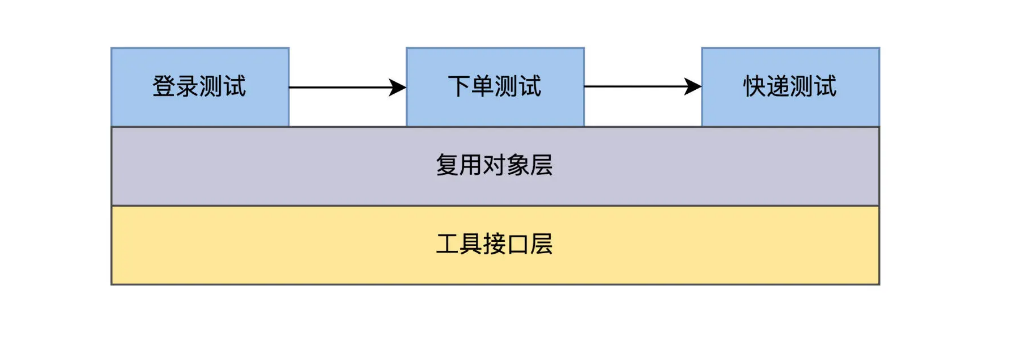
Such a design follows the software design philosophy of high cohesion and low coupling, and will be very convenient when the scale of automated testing is expanded in the future. For example, if you add a payment function, you can write the payment page object into the reuse library, create a new payment test case, connect it to the order module in the front, and connect it to the express module in the back, and then it can run.
Method 4: BDD hybrid framework
Another approach is a BDD hybrid framework. The full name of BDD is Behavior Drive Development, which defines test scenarios through Gherkin syntax.
Gherkin grammar contains a set of natural language-like keywords: when, given, then, given describes conditions, when describes behavior, and then describes results. The 3 elements of such a scene: context, action, and consequence make it clear.
Therefore, the test scenarios described by Gherkin grammar can be understood by both non-technical and technical personnel. Customers, requirements staff, developers, and testers each take what they need from BDD cases. Requirements staff get user manuals, developers get use cases, and testers get test cases. These have BDD framework support for generating code, such as Cucumber.
Method 5: Exploration of higher ROI, automated cutting-edge technology
Finally, I would like to talk about the cutting-edge automation technology that is currently popular and sounds cool.
AI testing has had high hopes, and we look forward to developing a full-stack automated testing solution that can automatically generate test cases and code with zero maintenance workload. It cannot be said that these are all mirror images. I believe that AI is currently only implemented in a small number of test fields, such as Applitools for image recognition, which can be used for picture verification; supervised learning in the game field, used for behavior cloning, etc.
I have also seen some demonstrations in which AI automatically generates test cases based on rules, but the demonstration is just a demonstration. The solution it demonstrates requires many conditions that are not yet available in reality, such as being based on a very ideal data model and so on. Therefore, I think the definition of AI “implementation” is that it takes the form of a product, rather than a personal amateur project or a piece of open source code.
Compared with AI testing, I am more optimistic about another idea of automated test generation, which is to automate case generation and code generation based on regularized or patternable business scenarios to form a quantifiable case discovery solution. I will show you how to implement this idea in Lecture 5.
Remember, testing work is to prove the success or failure of software functions, and the cornerstone of its methodology is determinism, not agnosticism. To put it simply, the test is weaving a net. Although the net will miss fish, I am confident that as long as we invest manpower and time, we can weave the net to a certain extent and catch all kinds of fish. Instead of catching a fish today and not knowing where the fish is tomorrow. This is why I don’t think AI can completely replace manual testing work.
Script reuse: What kind of code is worth writing?
Let’s take a look at the next piece of code written in go language:
package main

import (
"github.com/tebeka/selenium"
)

func login() {
var webDriver selenium.WebDriver
var err error
caps := selenium.Capabilities{"browserName": "chrome"}
if webDriver, err = selenium.NewRemote(caps, ""); err != nil {
panic(err)
}
defer webDriver.Quit()

err = webDriver.MaximizeWindow("")
if err != nil {
panic(err)
}

err = webDriver.Get("https://www.example.com/users/sign_in")
if err != nil {
panic(err)
}

username, err := webDriver.FindElement(selenium.ByID, "user_name")
if err != nil {
panic(err)
}

password, err := webDriver.FindElement(selenium.ByID, "user_password")
if err != nil {
panic(err)
}

login, err := webDriver.FindElement(selenium.ByXPATH, `//button[normalize-space(text())="Login"]`)
if err != nil {
panic(err)
}

err = username.SendKeys("openim@example.com")
if err != nil {
panic(err)
}

err = password.SendKeys("123456")
if err != nil {
panic(err)
}

err = login.Click()
if err != nil {
panic(err)
}
}

func main() {
login()
}
In this Go code:
- We first imported the
github.com/tebeka/seleniumpackage, which is a Go library that provides Selenium WebDriver bindings. - In the
loginfunction, we create a newWebDriverinstance and useChromeDriverto start a new browser session. - We then maximized the browser window, opened the login page, and found the elements for username, password, and login button.
- Finally, we entered our username and password and clicked the login button.
Improve reuse rate: one code, multiple browsers run
As you can see, the test case for script running is only on Chrome, but as a web application, it generally needs to support mainstream browsers on the market. Take a look at [Alibaba Cloud website](https://help.aliyun.com/document_detail /211434.html) supports 12 browsers, the list is as follows:
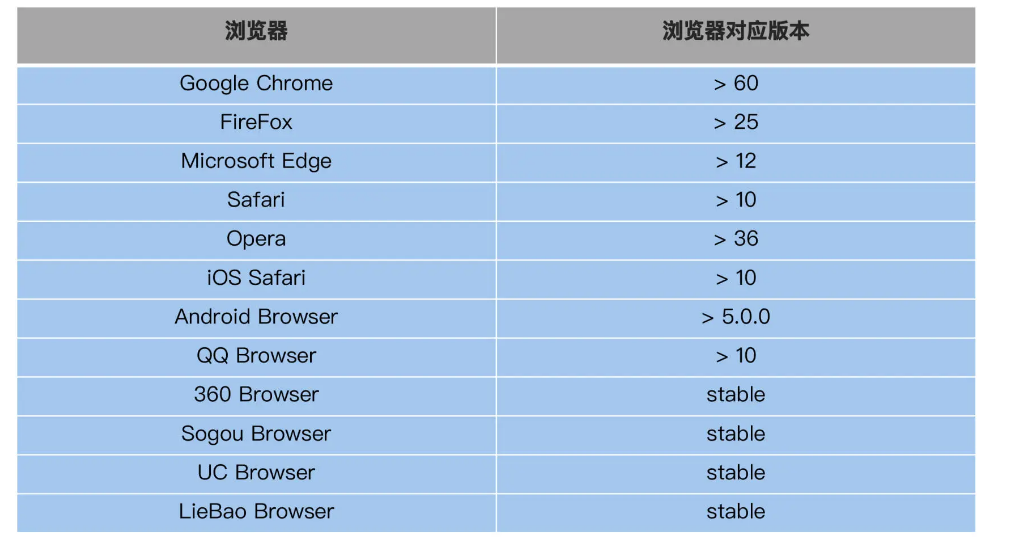
So, is there a way for our script to test 12 browsers at once? At this point we need to modify the script to support calling multiple browser drivers:
package main

import (
"fmt"
"github.com/tebeka/selenium"
"github.com/tebeka/selenium/chrome"
)

func login(driver selenium.WebDriver) {
err := driver.MaximizeWindow("")
if err != nil {
panic(err)
}

err = driver.Get("https://www.example.com/users/sign_in")
if err != nil {
panic(err)
}

username, err := driver.FindElement(selenium.ByID, "user_name")
if err != nil {
panic(err)
}

password, err := driver.FindElement(selenium.ByID, "user_password")
if err != nil {
panic(err)
}

login, err := driver.FindElement(selenium.ByXPATH, `//button[normalize-space(text())="Login"]`)
if err != nil {
panic(err)
}

err = username.SendKeys("openim@example.com")
if err != nil {
panic(err)
}

err = password.SendKeys("123456")
if err != nil {
panic(err)
}

err = login.Click()
if err != nil {
panic(err)
}
}

func main() {
drivers := []string{"chrome", "firefox"} // Two browser drivers are listed here, more drivers can be added according to actual needs

for _, driverName := range drivers {
var webDriver selenium.WebDriver
var err error

switch driverName {
case "chrome":
caps := selenium.Capabilities{"browserName": "chrome"}
webDriver, err = selenium.NewRemote(caps, "")
if err != nil {
panic(err)
}
case "firefox":
caps := selenium.Capabilities{"browserName": "firefox"}
webDriver, err = selenium.NewRemote(caps, "")
if err != nil {
panic(err)
}
default:
fmt.Printf("Unsupported driver: %s\n", driverName)
continue
}

defer webDriver.Quit()
login(webDriver)
}
}
In this Go code:
- We define a
loginfunction, which accepts aselenium.WebDriverinstance as a parameter. Thisloginfunction performs the same login steps as in the Java code. - In the
mainfunction, we create adriversarray, which contains the name of the browser driver we want to test. We iterate through this array and create a newWebDriverinstance for each driver name. - For each
WebDriverinstance, we call theloginfunction to perform the login test.
It is run as many times as there are drivers. Each time it is run, the name of the driver is obtained from the iteration array and handed over to the script to start the corresponding browser.
Improve reuse rate: one code, multiple data runs
We have just taken the first step, good, let’s continue to look at the script to see if there is anything that can be improved. Now, our script can only test one set of user data, the username is openim and the password is 123456. In the testing methodology, a test case should have multiple sets of test data. The data formats of legal user names are more than that. Equivalence classes are divided according to character types, and there are at least 5 sets:
- ASCII characters
- Numbers
- Special characters
- Latin characters
- Chinese characters
The password is usually numbers, ASCII characters plus 3 special characters. We can develop at least 5*3=15 legal username and password combinations as test cases.
package main

import (
"github.com/tebeka/selenium"
)

type UserPassword struct {
username string
password string
}

func login(driver selenium.WebDriver, credentials UserPassword) {
err := driver.MaximizeWindow("")
if err != nil {
panic(err)
}

err = driver.Get("https://www.example.com/users/sign_in")
if err != nil {
panic(err)
}

usernameField, err := driver.FindElement(selenium.ByID, "user_name")
if err != nil {
panic(err)
}

passwordField, err := driver.FindElement(selenium.ByID, "user_password")
if err != nil {
panic(err)
}

loginButton, err := driver.FindElement(selenium.ByXPATH, `//button[normalize-space(text())="Login"]`)
if err != nil {
panic(err)
}

err = usernameField.SendKeys(credentials.username)
if err != nil {
panic(err)
}

err = passwordField.SendKeys(credentials.password)
if err != nil {
panic(err)
}

err = loginButton.Click()
if err != nil {
panic(err)
}
}

func main() {
drivers := []string{"chrome", "firefox"}
userPasswords := []UserPassword{
{"xxxx", "123456"},
{"Test User", "Welcome1"},
// ... other user-password combinations
}

for _, driverName := range drivers {
var webDriver selenium.WebDriver
var err error

caps := selenium.Capabilities{"browserName": driverName}
webDriver, err = selenium.NewRemote(caps, "")
if err != nil {
panic(err)
}
defer webDriver.Quit()

for _, credentials := range userPasswords {
login(webDriver, credentials)
}
}
}
In this Go code:
- We define a
UserPasswordstructure to save the combination of username and password. - The
loginfunction now accepts aselenium.WebDriverinstance and aUserPasswordinstance as parameters. - In the
mainfunction, we created two arrays, one to save the name of the browser driver to be tested, and the other to save the combination of username and password to be tested. - We iterate through each browser driver name and create a new
WebDriverinstance for each driver name. We then iterate through each username and password combination and call theloginfunction on each combination to perform a login test.
Improve reuse rate: one code, run in multiple environments
Now we have figured out how to improve ROI, which is to reuse an automated test program in as many different test scenarios as possible. These test scenarios are inherently valid test requirements, and converting them into automation is a multi-purpose effort.
Are there any other scenarios? Of course, for example, our product release pipeline runs through the delivery process from development environment, test environment, quasi-production environment to production environment, from low to high.
Then your test script needs to be compatible with every environment and can be run directly in all environments where it needs to be run without any modifications. A script is run in 4 environments: dev, test, stage, and productin. Our n3=4, n=n1+n2+n3=15+12+4=31 times
How to run the same test program in multiple environments? The best way is to extract the configuration file:
Our automated testing can also implement a similar mechanism. If you are smart, you can consider developing a test configuration file loading module yourself. It does not require much code, but it will directly increase ROI.
In addition, if your product supports multiple languages, running one code in multiple languages is also a good idea that will significantly increase the ROI of automated testing.
Like the code above, currently only supports Chinese pages. Assuming that our product requires support for 9 languages, we can allow the page control to load label text in different languages.
package main

import (
"github.com/tebeka/selenium"
)

type Credentials struct {
username string
password string
}

type Profile struct {
url string
}

type Label struct {
loginText string
}

func login(driver selenium.WebDriver, credentials Credentials, profile Profile, language string, label Label) {
err := driver.MaximizeWindow("")
if err != nil {
panic(err)
}

err = driver.Get(profile.url)
if err != nil {
panic(err)
}

usernameField, err := driver.FindElement(selenium.ByID, "user_name")
if err != nil {
panic(err)
}

passwordField, err := driver.FindElement(selenium.ByID, "user_password")
if err != nil {
panic(err)
}

loginButton, err := driver.FindElement(selenium.ByXPATH, `//button[normalize-space(text())="`+label.loginText+`"]`)
if err != nil {
panic(err)
}err = usernameField.SendKeys(credentials.username)
	if err != nil {
		panic(err)
	}

	err = passwordField.SendKeys(credentials.password)
	if err != nil {
		panic(err)
	}

	err = loginButton.Click()
	if err != nil {
		panic(err)
	}
}

func main() {
	drivers := []string{"chrome", "firefox"}
	credentialsList := []Credentials{
		{"xxxx", "123456"},
		{"测试用户", "Welcome1"},
		// ... other user-password combinations
	}
	profiles := []Profile{
		{url: "auto-dev.yml"},
		{url: "auto-test.yml"},
		{url: "auto-prod.yml"},
		// ... other profiles
	}
	languages := []string{"en", "zh_CN", "zh_TW", "FR"}
	labels := []Label{
		{loginText: "登录"},
		// ... other labels
	}

	for _, driverName := range drivers {
		var webDriver selenium.WebDriver
		var err error

		caps := selenium.Capabilities{"browserName": driverName}
		webDriver, err = selenium.NewRemote(caps, "")
		if err != nil {
			panic(err)
		}
		defer webDriver.Quit()

		for _, credentials := range credentialsList {
			for _, profile := range profiles {
				for _, language := range languages {
					for _, label := range labels {
						login(webDriver, credentials, profile, language, label)
					}
				}
			}
		}
	}
}
在这段Go代码中:
- 定义了几个结构体和类型来表示测试方法的参数。
login函数现在接受五个参数,每个参数对应一个@Iteration注解。- 在
main函数中,创建了几个数组来保存每个@Iteration注解的值。使用嵌套循环来遍历这些数组,并为每个参数组合调用login函数。 - 在
login函数中,使用参数值执行登录测试。
现在一份脚本经过了多浏览器、多数据、多环境和多语言 4 轮打磨,运行的次数 n=n1+n2+n3+n4=12+15+4+9=40 次。如果各个场景有关联关系,比如页面的语言和测试数据有耦合,英文页面的 encoding 和数据的 charset 有关联,那么两个场景的次数就是完全组合,采用乘法,15*9=135 次。
而且,从脚本的变化可以看到,脚本第一版本里的 hard code 也一个个被消除了,取而代之的是数据驱动。消除 hard code 是提升 ROI 的结果。
还有哪些工作值得做?
维护工作量的不确定性是自动化测试的一个重要风险,所以我们有必要看一下维护的工作量都花在哪里了。
- 被测截面发生变化带来的维护工作量。比如 UI 自动化测试的产品页面发生了变化,API 自动化测试的接口做了重构。
- 诊断自动化测试的工作量,如果把自动化测试结果分为真阳,假阳,真阴,假阴。那假阳和假阴都是需要诊断的。
Auto Gen Auto:所有测试工作即代码
我们前面用了 4 讲篇幅,讨论 ROI 模型和由此衍生出来的一套实践原则,从分层测试、选型思路和具体代码多个角度探索提升 ROI 的方法。
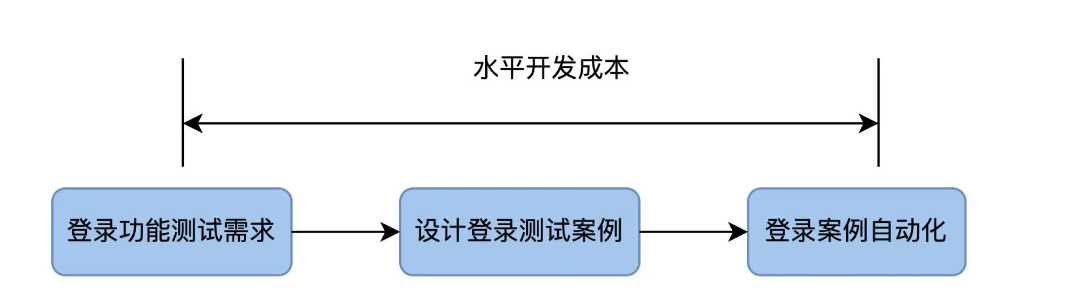
这些方法还都是基于常规的自动化测试开发流程,先有测试需求,再设计测试案例,然后做自动化。以登录测试为例:

自动化测试的开发成本,就是把测试需求转变成自动化测试代码这个过程花费的时间。在我们的图里,它是从左向右,所以我管它叫做水平开发成本。
当登录功能测试需求发生变化时,就会重新走一遍这个流程,出现了多个版本的测试需求,也会带来多个版本的自动化测试案例。从下图可见,这个版本是自上向下增加,所以我管它叫做垂直维护成本。
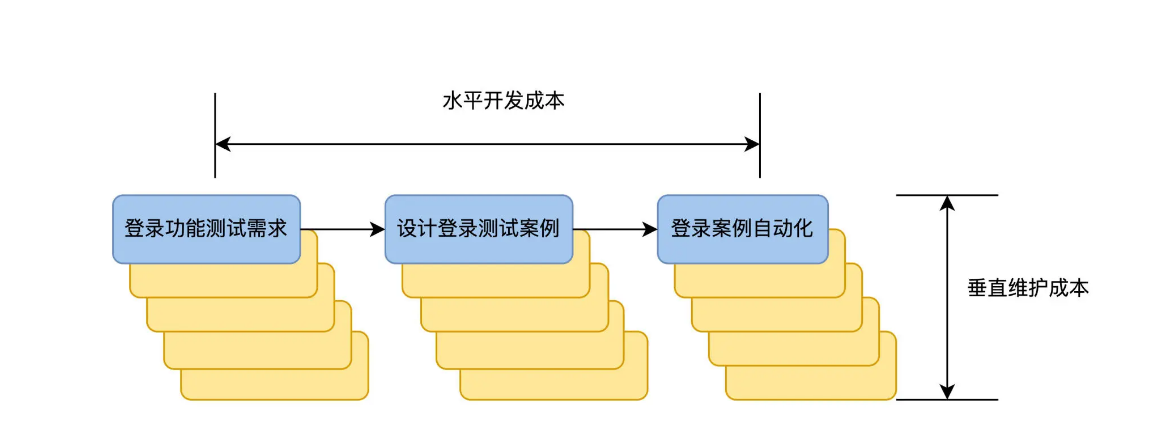
我们现在可以直观地看到开发成本和维护成本了。好,问题来了,有没有办法从流程上动手术,来降低这两个成本呢?
这就是我们今天要讲的 Automation Generate Automation,也叫自动化产生自动化测试代码,为了方便起见,下面的篇幅用缩写 Auto Gen Auto 来指代。
Auto Gen Auto 技术
常规的自动化测试,是指用代码实现设计好的 TestCase,而 Auto Gen Auto 的目的是让 Test Case 生成也自动化,如下图所示。
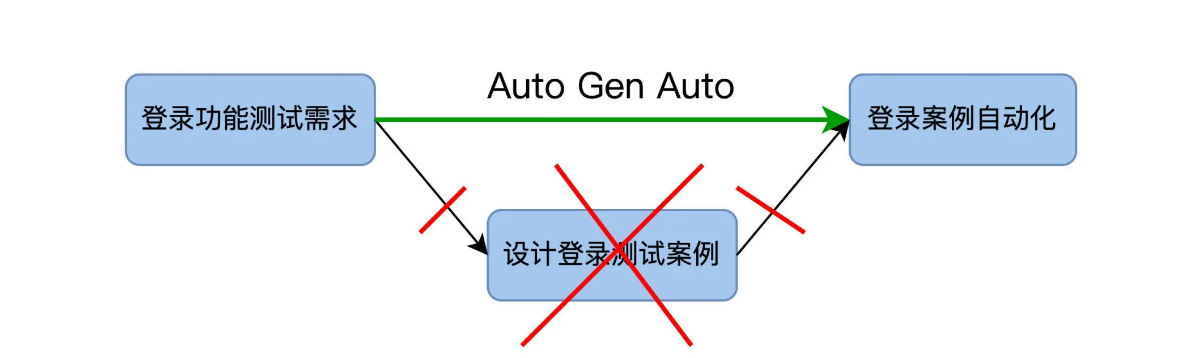
因为从测试需求到自动化测试案例是完全自动化的,每次需求改变的时候,只需运行一次 Auto Gen Auto 即可生成新的自动化案例,垂直维护成本为零。所以 Auto Gen Auto 技术如果能落地,ROI 就会大大提高。
从何处下手
业界熟知的测试方法是黑盒测试和白盒测试。白盒测试从测试案例设计开始,需要我们先了解代码逻辑结果,一个函数里有几个判断分支,处理那些数据。基于这些了解,再设计案例验证函数输出和达成代码覆盖率。
在白盒测试里,Auto Gen Auto 不是啥稀奇事,XUnit 框架都提供了不少开发 IDE 的 plugin,可以扫描一个 class 的函数,直接产生 test 方法。开发人员只需补充少量代码,test 方法就可以运转起来了。
与之对应的是黑盒测试,测试案例设计不基于产品代码,而是用户规格说明。比如,用户在订餐系统上完成一个订单,用户该怎么操作,下单成功后应该收到物流单号等等,设计这些测试案例的目的是验证业务能够完成,不需要去看代码。
今天,我们要关注的是在黑盒测试领域的 Auto Gen Auto,这个更有挑战性,也更有探索价值。因为,作为测试人员花了大量时间来设计黑盒测试案例,而且还要手工维护这些测试案例的变化,这个过程要是都能自动化了,就会省去很大的重复又枯燥的工作量。
如何实现
怎么做到 Auto Gen Auto 呢?用代码生成代码,前提是测试需求得有一定的规则或模式,然后代码才能解析规则,根据规则生成最终的测试代码。
这个实现思路,在开发中是很常用的,比如 Maven Archetype 使用模版自动生成项目代码,Soap 使用 WSDL 来生成调用桩等等,原理图如下。
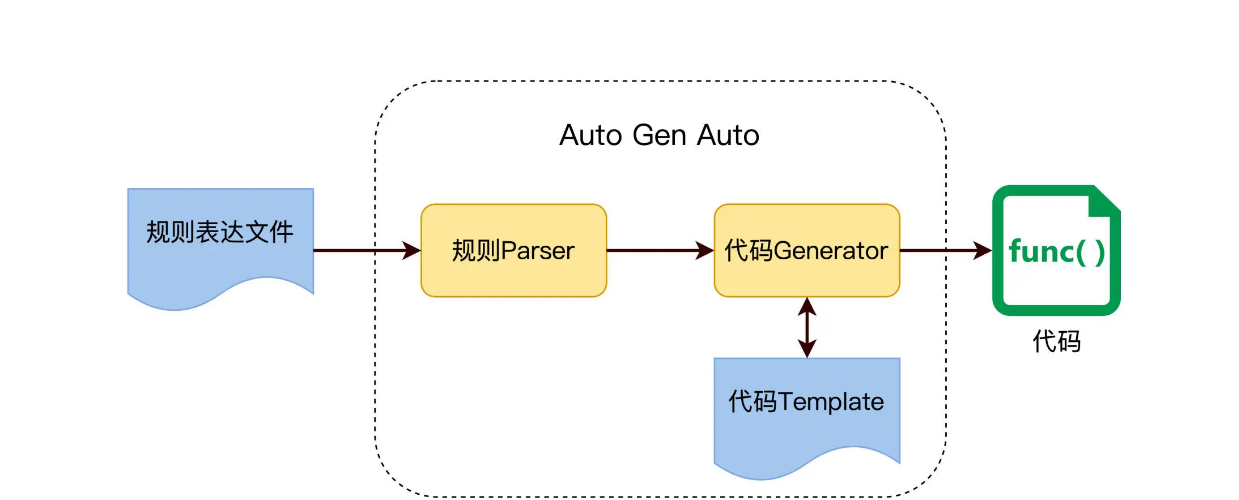
所以,要做 Auto Gen Auto,我们的目标是先要找出测试需求里的这些规则,并把它们表达出来,放在一个规则文件里。我们看看下面的例子。
测试等价类的规则
远在天边,近在眼前,我们在测试案例设计中经常用到的等价类和边价值方法,就可以作为 Auto Gen Auto 的规则。
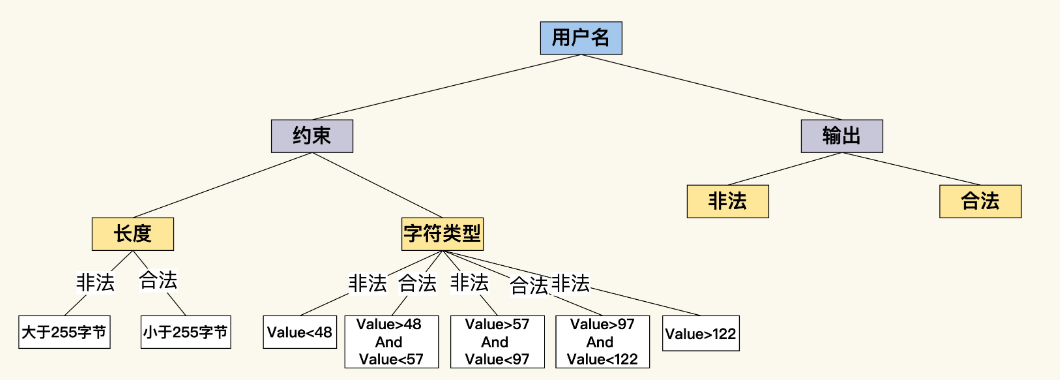
等价类是指某个输入域的子集合,在同一个子集合里的所有元素对于测试的效果都是等价的。
我们要测试一个订餐系统的用户名,首先要了解用户名上的约束。从长度上来看,假设用户名最大长度是 255 个字节,根据这个约束,至少能产生 2 个测试等价类:有效等价类是小于 255 字节的用户名,无效等价类是大于 255 字节的用户名。测试用户注册功能时,就可以用到这 2 个等价类了。
用同样的思路看用户名的另外一个约束,那就是字符类型的限制,假设用户名只能由英文字母和数字组成,根据这个约束,又可以产生多个等价类,中文字符、ASCII 字符、数字、High ASCII 等等。
如果能让测试案例和等价类自动对应,然后依据规则动态产生测试案例,这些问题就会迎刃而解。不过,我们得先把这些约束规则外化表达出来,在这里,我用一个 user-rule.yaml 文件来表达这些规则。
name: user name rules
  appliedTestCase: register, login
  rules:
    lengthRule:
      express: <=255 chars
    characterRule:
      express: value>=97 and value<=122
      express: value>=48 and value<=57
然后,我们写一段代码,从这个 YAML 文件中直接把规则加载进来,在内存中形成一个分类树。
业务的逻辑规则
用等价类的规则表达小试牛刀后,我们尝到了甜头。看来,只要能把规则表达出来,生成测试案例这个工作就可以交给代码去做。我们再找一个更加实用的场景,来看看怎么落地。
在做 API 测试的时候,restAPI 的接口一般是通过 Open API 规范来描述。在设计阶段,开发先定义要实现的 API 接口,Client 要发送什么样的 Request,Server 要返回什么样的 Response。
比如下面的 user-restapi.yaml 文件,就是遵循 Open API 规范,定义了一个根据 name 查询 User 的 RestAPI。
/api/users:
    get:
      description: 通过name查询用户.
      parameters:
        - username
          type: string
          description: 用户name
      responses:
        '200':
          description: 成功返回符合查询条件的用户列表.
          schema:
            type: array
            items:
              $ref: '#/definitions/User'
这个接口很简单,但它也声明了一个简单的契约,Client 要想查询 User,它需要向 server 发送一个err = usernameField.SendKeys(credentials.username) if err != nil { panic(err) }
err = passwordField.SendKeys(credentials.password)
if err != nil {
	panic(err)
}

err = loginButton.Click()
if err != nil {
	panic(err)
}
}
func main() { drivers := []string{“chrome”, “firefox”} credentialsList := []Credentials{ {“xxxx”, “123456”}, {“测试用户”, “Welcome1”}, // … other user-password combinations } profiles := []Profile{ {url: “auto-dev.yml”}, {url: “auto-test.yml”}, {url: “auto-prod.yml”}, // … other profiles } languages := []string{“en”, “zh_CN”, “zh_TW”, “FR”} labels := []Label{ {loginText: “登录”}, // … other labels }
for _, driverName := range drivers {
	var webDriver selenium.WebDriver
	var err error

	caps := selenium.Capabilities{"browserName": driverName}
	webDriver, err = selenium.NewRemote(caps, "")
	if err != nil {
        panic(err)
	}
	defer webDriver.Quit()

	for _, credentials := range credentialsList {
        for _, profile := range profiles {
            for _, language := range languages {
                for _, label := range labels {
                    login(webDriver, credentials, profile, language, label)
                }
            }
        }
	}
}
}
在这段Go代码中:
1. 定义了几个结构体和类型来表示测试方法的参数。
2. `login`函数现在接受五个参数,每个参数对应一个`@Iteration`注解。
3. 在`main`函数中,创建了几个数组来保存每个`@Iteration`注解的值。使用嵌套循环来遍历这些数组,并为每个参数组合调用`login`函数。
4. 在`login`函数中,使用参数值执行登录测试。
现在一份脚本经过了多浏览器、多数据、多环境和多语言 4 轮打磨,运行的次数 n=n1+n2+n3+n4=12+15+4+9=40 次。如果各个场景有关联关系,比如页面的语言和测试数据有耦合,英文页面的 encoding 和数据的 charset 有关联,那么两个场景的次数就是完全组合,采用乘法,15*9=135 次。
而且,从脚本的变化可以看到,脚本第一版本里的 hard code 也一个个被消除了,取而代之的是数据驱动。消除 hard code 是提升 ROI 的结果。
### 还有哪些工作值得做?
维护工作量的不确定性是自动化测试的一个重要风险,所以我们有必要看一下维护的工作量都花在哪里了。
1. 被测截面发生变化带来的维护工作量。比如 UI 自动化测试的产品页面发生了变化,API 自动化测试的接口做了重构。
2. 诊断自动化测试的工作量,如果把自动化测试结果分为真阳,假阳,真阴,假阴。那假阳和假阴都是需要诊断的。
## Auto Gen Auto:所有测试工作即代码
我们前面用了 4 讲篇幅,讨论 ROI 模型和由此衍生出来的一套实践原则,从分层测试、选型思路和具体代码多个角度探索提升 ROI 的方法。
这些方法还都是基于常规的自动化测试开发流程,先有测试需求,再设计测试案例,然后做自动化。以登录测试为例:

自动化测试的开发成本,就是把测试需求转变成自动化测试代码这个过程花费的时间。在我们的图里,它是从左向右,所以我管它叫做水平开发成本。

当登录功能测试需求发生变化时,就会重新走一遍这个流程,出现了多个版本的测试需求,也会带来多个版本的自动化测试案例。从下图可见,这个版本是自上向下增加,所以我管它叫做垂直维护成本。

我们现在可以直观地看到开发成本和维护成本了。好,问题来了,有没有办法从流程上动手术,来降低这两个成本呢?
这就是我们今天要讲的 Automation Generate Automation,也叫自动化产生自动化测试代码,为了方便起见,下面的篇幅用缩写 Auto Gen Auto 来指代。
### Auto Gen Auto 技术
常规的自动化测试,是指用代码实现设计好的 TestCase,而 Auto Gen Auto 的目的是让 Test Case 生成也自动化,如下图所示。

因为从测试需求到自动化测试案例是完全自动化的,每次需求改变的时候,只需运行一次 Auto Gen Auto 即可生成新的自动化案例,垂直维护成本为零。所以 Auto Gen Auto 技术如果能落地,ROI 就会大大提高。
### 从何处下手
业界熟知的测试方法是黑盒测试和白盒测试。白盒测试从测试案例设计开始,需要我们先了解代码逻辑结果,一个函数里有几个判断分支,处理那些数据。基于这些了解,再设计案例验证函数输出和达成代码覆盖率。
在白盒测试里,Auto Gen Auto 不是啥稀奇事,XUnit 框架都提供了不少开发 IDE 的 plugin,可以扫描一个 class 的函数,直接产生 test 方法。开发人员只需补充少量代码,test 方法就可以运转起来了。
与之对应的是黑盒测试,测试案例设计不基于产品代码,而是用户规格说明。比如,用户在订餐系统上完成一个订单,用户该怎么操作,下单成功后应该收到物流单号等等,设计这些测试案例的目的是验证业务能够完成,不需要去看代码。
今天,我们要关注的是在黑盒测试领域的 Auto Gen Auto,这个更有挑战性,也更有探索价值。因为,作为测试人员花了大量时间来设计黑盒测试案例,而且还要手工维护这些测试案例的变化,这个过程要是都能自动化了,就会省去很大的重复又枯燥的工作量。
### 如何实现
怎么做到 Auto Gen Auto 呢?用代码生成代码,前提是测试需求得有一定的规则或模式,然后代码才能解析规则,根据规则生成最终的测试代码。
这个实现思路,在开发中是很常用的,比如 Maven Archetype 使用模版自动生成项目代码,Soap 使用 WSDL 来生成调用桩等等,原理图如下。

所以,要做 Auto Gen Auto,我们的目标是先要找出测试需求里的这些规则,并把它们表达出来,放在一个规则文件里。我们看看下面的例子。
### 测试等价类的规则
远在天边,近在眼前,我们在测试案例设计中经常用到的等价类和边价值方法,就可以作为 Auto Gen Auto 的规则。
等价类是指某个输入域的子集合,在同一个子集合里的所有元素对于测试的效果都是等价的。
我们要测试一个订餐系统的用户名,首先要了解用户名上的约束。从长度上来看,假设用户名最大长度是 255 个字节,根据这个约束,至少能产生 2 个测试等价类:有效等价类是小于 255 字节的用户名,无效等价类是大于 255 字节的用户名。测试用户注册功能时,就可以用到这 2 个等价类了。
用同样的思路看用户名的另外一个约束,那就是字符类型的限制,假设用户名只能由英文字母和数字组成,根据这个约束,又可以产生多个等价类,中文字符、ASCII 字符、数字、High ASCII 等等。
如果能让测试案例和等价类自动对应,然后依据规则动态产生测试案例,这些问题就会迎刃而解。不过,我们得先把这些约束规则外化表达出来,在这里,我用一个 user-rule.yaml 文件来表达这些规则。
```yaml
name: user name rules
appliedTestCase: register, login
rules:
lengthRule:
express: <=255 chars
characterRule:
express: value>=97 and value<=122
express: value>=48 and value<=57
然后,我们写一段代码,从这个 YAML 文件中直接把规则加载进来,在内存中形成一个分类树。
业务的逻辑规则
用等价类的规则表达小试牛刀后,我们尝到了甜头。看来,只要能把规则表达出来,生成测试案例这个工作就可以交给代码去做。我们再找一个更加实用的场景,来看看怎么落地。
在做 API 测试的时候,restAPI 的接口一般是通过 Open API 规范来描述。在设计阶段,开发先定义要实现的 API 接口,Client 要发送什么样的 Request,Server 要返回什么样的 Response。
比如下面的 user-restapi.yaml 文件,就是遵循 Open API 规范,定义了一个根据 name 查询 User 的 RestAPI。
/api/users:
    get:
      description: 通过name查询用户.
      parameters:
        - username
          type: string
          description: 用户name
      responses:
        '200':
          description: 成功返回符合查询条件的用户列表.
          schema:
            type: array
            items:
              $ref: '#/definitions/User'
这个接口很简单,但它也声明了一个简单的契约,Client 要想查询 User,它需要向 server 发送一个Cucumber generates easy-to-understand test reports that show which tests passed, which tests failed, and why.
Cucumber supports Go language
Yes, Cucumber does support the Go language, implemented through a project called Godog. Here is some relevant information:
- Godog Project:
- Godog is the Go language implementation of Cucumber, the official Cucumber BDD (Behavior Driven Development) framework for the Go language. The framework merges specification and test documentation, using Gherkin-formatted scenario descriptions to format the given, when and then specifications. It is worth noting that Godog does not interfere with the standard
go testcommand behavior.
- Godog is the Go language implementation of Cucumber, the official Cucumber BDD (Behavior Driven Development) framework for the Go language. The framework merges specification and test documentation, using Gherkin-formatted scenario descriptions to format the given, when and then specifications. It is worth noting that Godog does not interfere with the standard
- Official Document:
- Godog is also mentioned in Cucumber’s official documentation, and there is a dedicated repository for maintaining the Godog project.
- GitHub repository:
- Godog’s GitHub repository is the official source code repository of the project. You can find all information about Godog here, including how to use it for BDD, examples, documentation and licensing information for the project.
- Other information:
- There is also a related GitHub Issue proposing to add Go (Godog) support to Cucumber’s language-service project, which shows the Cucumber community’s continued focus and development on Go language support.
What should be tested from a single entity to a microservice cluster?
How to measure single body
We now have an app called FoodCome. When it was first developed it was a monolithic system.
Here I want to explain what a single system is. The general understanding is that a single system is a whole, developed in one language, building all the code at once, and producing a deployment entity, which is a process in the running state. For example, a common web application is a war package.
This FoodCome is a web application that provides users with ordering functions. Users can place orders through their mobile phones. After the order is generated, the restaurant can receive the order, and the kitchen will complete the production and transfer it to logistics to deliver it to the user.
In order to analyze the test requirements, we use the hexagonal architecture diagram method to clarify the interactive interfaces inside and outside the system. The hexagonal architecture method draws services as a nested hexagon. The outermost large hexagon is the adapter layer, which represents all interactions between the system and the outside world. The inner hexagon is the domain business layer. The adapter layer is responsible for external interaction, which has little to do with business. It is generally a common technology, mainly drivers, protocols and infrastructure, while the domain layer is the organization and implementation of business logic. If you are not familiar with the hexagonal architecture, you can also refer to here.
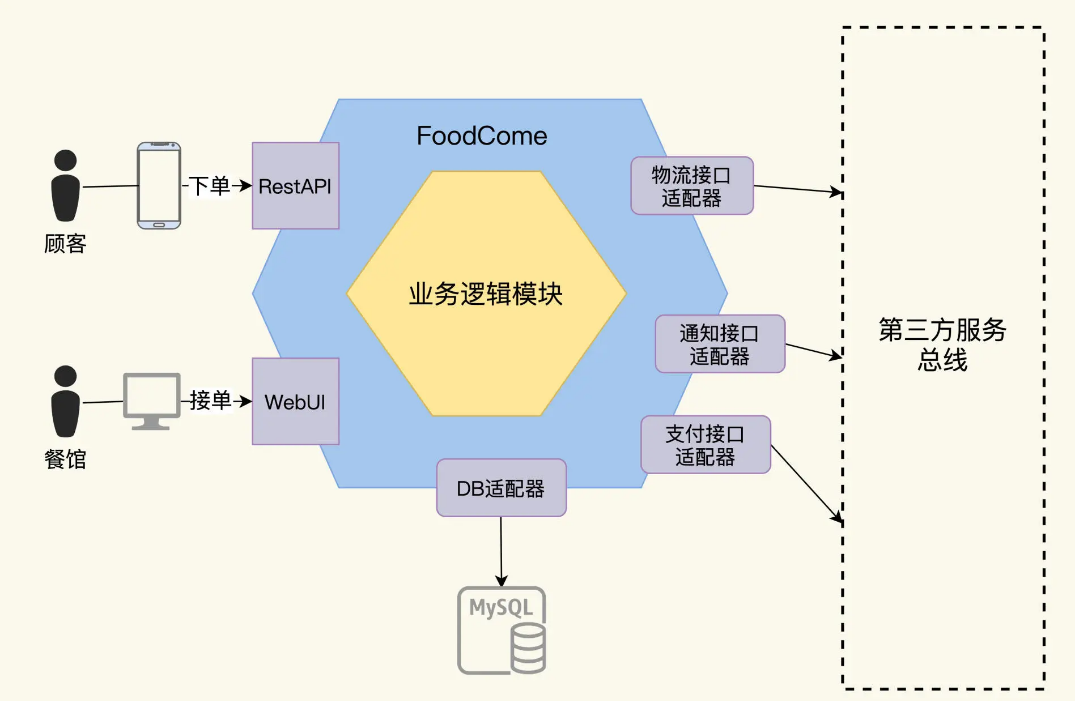
FoodCome is a single system. After it is run, there are two types of interfaces on the outer hexagon:
- User interface, there are 2 types of users, one is the diners and the other is the restaurant owners. Customers place orders through their mobile phones and enter the FoodCome system, while restaurants can view and accept orders through FoodCome’s Web client.
- Adapter interface, integration interface with third-party systems. FoodCome integrates logistics systems, notification systems and payment systems. After the customer’s order is paid through the payment system, the restaurant starts processing. After the processing is completed, the food is expressly delivered to the customer through the logistics system. Throughout the workflow, status change notifications will be sent to users.
Now that the two interfaces are clear, let’s analyze the test requirements in detail.
To define test requirements, you must first clarify functional requirements. Functional requirements describe the functions of the software. Does it sound like a circular definition? It is not easy to describe the functions of software clearly. Here we borrow the method proposed by Mike Cain. A software functional requirement must answer these three questions: First, what is the value of this function? Second, how does the software realize this value? Third, who can this function bring value to?
Testing requirements BDD Feature
The full name of BDD is Behavior Drive Development, which is the behavior-driven development model. If you want to achieve the level of driven development, the definition of this Behavior must be detailed enough so that developers know how to implement it. Similarly, testers also know how to test.

How does BDD do it? It refines the User Story into one or more features, and each feature is a testable scenario.
There are also format requirements for writing this feature file. The feature file is written through a syntax keyword template called Gherkins.
Gherkins syntax keyword template The common keywords provided by Gherkins are: 1. Given: the precondition of the user scenario, which can be a time condition or the output result of another user scenario. 2.When: The behavioral operation performed by the user in this scenario 3.Then: The output result of the behavior 4.And: Connecting multiple keywords
Common keywords provided by Gherkins are:
- Given: The precondition of the user scenario, which can be a time condition or the output result of another user scenario.
- When: The behavioral operations performed by the user in this scenario
- Then: the output of the behavior
- And: Connect multiple keywords
How to test microservices
At the same time, software technology is also developing, and lightweight deployment methods such as VMware, Docker and Kubernetes have emerged, which makes splitting less difficult and reducing deployment costs. After the birth of the microservice architecture, a system is split into multiple independently developed and run services. Regardless of the size of this service, the industry calls it microservices. They also have a set of technical specifications for service governance to ensure the reliability and scalability of deployment and operation.
As the business scale expanded and the number of developers increased, FoodCome was split into 5 microservices, as follows:
- Order service: Process orders placed by users;
- Logistics services: Foodcome’s internal logistics management, docking with external logistics;
- Restaurant service: manage restaurant information and participate in order workflow;
- Account service: manage customer information in orders and connect with external payment systems.
- Notification service: generate messages to notify users, and connect with external email systems.
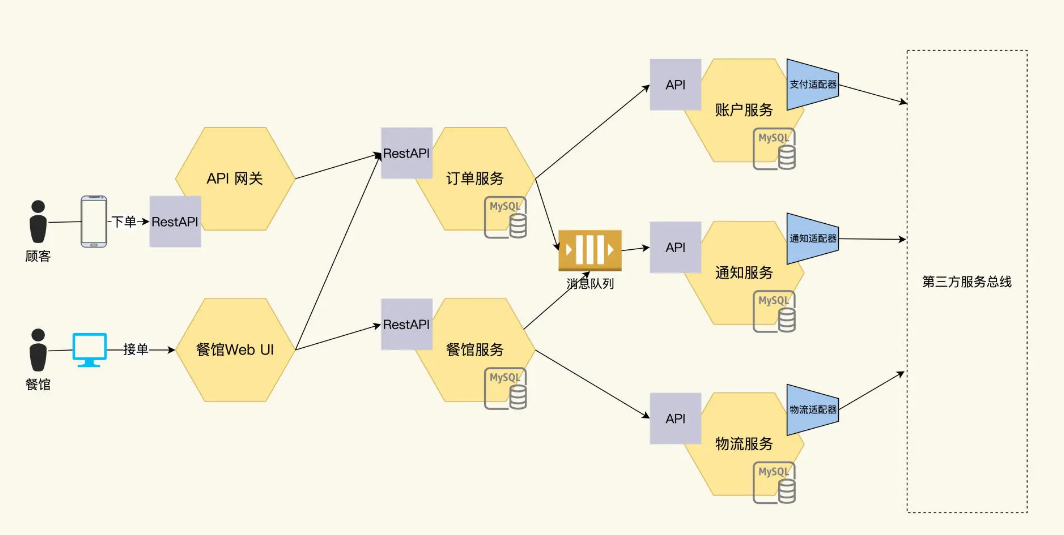
Under this architecture, the external interface of the original single application remains unchanged, but the internal interface of the single application is replaced by five independent microservices. The user’s order request first reaches the order service through the API gateway. After completing the payment, the restaurant receives the order and then delivers the order through the logistics system.
Each microservice achieves autonomy, independent development, release and deployment, speeding up release. And it is also very convenient to add new functions, such as login authentication. Just add another authentication service in this picture. This is a benefit to customers.
The question now is, what changes does this bring to testing? After the split, the FoodCome system became a microservice cluster, like a huge machine composed of multiple parts that mesh with each other and work together. As a tester, you not only need to verify that each part is qualified, but also have a way to predict that the machine they are assembled will work properly.
**The difficulty in testing here is that as the number of microservices increases, the amount of interaction between services will also increase dramatically. Compared with single systems, integration testing is more critical under a microservice cluster architecture. **
To do integration testing, we first need to understand how microservices interact. Under the microservice architecture, interaction can have many styles, such as RPC remote procedure call, REST style, Message Queue message queue, etc. According to the interaction methods and styles, I have organized them into a table for your convenience.
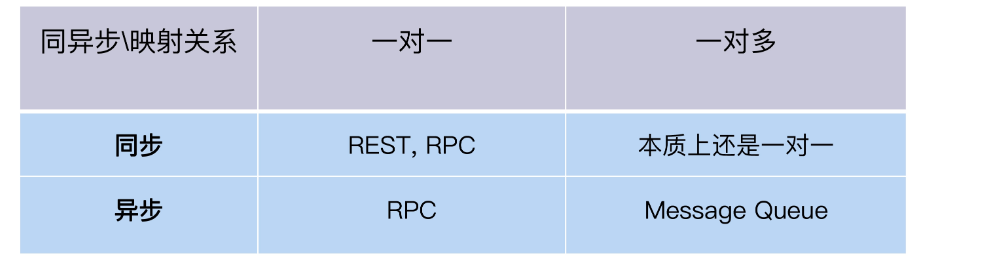
FoodCome uses two interaction methods, RestAPI and Message Queue.
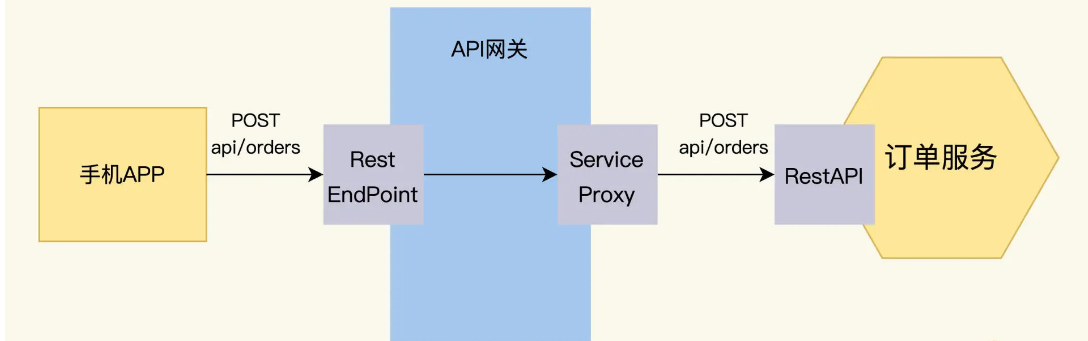
RestAPI is used to handle real-time interactions between services, such as the front-end calling the order service through the API gateway to place an order.
Message Queue is used to handle asynchronous interactions. The order service and notification service exchange information through Message Queue.
Let’s take a look at the specific implementation of these two interaction methods, and then find out the test points.
REST
We need to first know how the Rest interface is designed before we can find out what to test later.
What is REST
REST is the abbreviation of Representational State Transfer, which is called presentation layer state transfer. It sounds awkward, but you will understand it once I say it. It is actually a loose set of specifications, not a strict agreement, nor a mandatory standard. The purpose of this specification is to make API design simpler and easier to understand.
It contains the following basic principles:
- REST is based on HTTP protocol;
- Expose Resource resources through HTTP URL;
- Provide operations on Resource through HTTP operation primitives. GET, POST, PUT, and DELETE correspond to operations of addition, deletion, modification, and query.
As long as the developer understands the HTTP protocol, it is easy to express his API in REST style according to the above rules. Similarly, when another developer sees a REST API, he can quickly figure out what these APIs are used for, without having to read difficult-to-understand documentation.
This is the advantage of REST. APs designed in the REST style have very low learning costs. Therefore, many services on the Internet provide APIs through REST, such as Amazon’s AWS cloud service, Google’s Document service, and so on.
REST API design of Order Service
Following the REST specification, the interface design of Order Service can be clarified according to the “noun-verb” idea.
First look for the noun, Order, which corresponds to a Resource resource on REST:
http://api.foodcome.com/api/v1/orders
Then find the verb “place an order”, which corresponds to the POST primitive on the HTTP protocol. Sending a POST request to the Orders resource is to place an order:
POST http://api.foodcome.com/api/v1/orders
Then the verb “query order” is converted into the GET primitive on the HTTP protocol, and the query condition orderID is added to the URL in the form of a parameter:
GET http://api.foodcome.com/api/v1/orders?orderID=123456
Similarly, the PUT primitive is used to modify an order, and the DELETE primitive is used to delete an order.
We use the same method to convert other nouns “customer” and “restaurant” into Resources and operations:
http://api.foodcome.com/api/v1/customers
http://api.foodcome.com/api/v1/restaurants
RestAPI specification definition of Order service
Immature development teams often write code and design APIs at the same time. It is not difficult to speculate that a thousand developers will write a thousand Order Service APIs, although they all claim to follow the REST specification.
Therefore, a good practice is that the development team needs to design the RestAPI first and express it, and then the team can review it and reach an understanding.
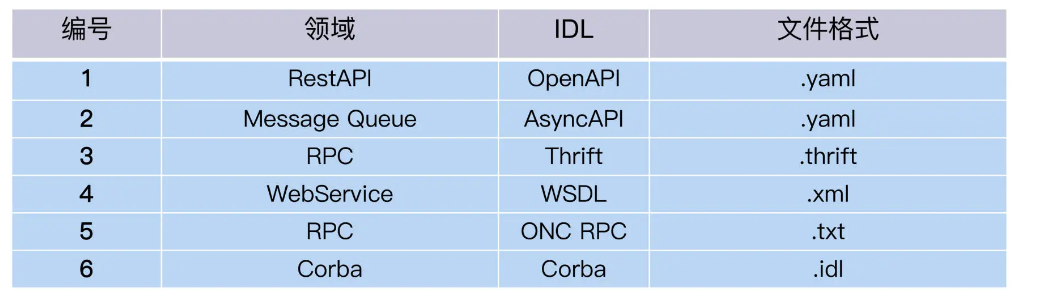
What is the carrier of expression? Here we have to mention the concept of Interface Definition Language. As the name suggests, IDL is an interface definition language, which describes the API through a syntax rule that is independent of the programming language. Different types of APIs have different IDLs.
We use REST mainstream IDL, which is the syntax specification of OpenAPI, to describe the parameters of the interface for placing orders, and write the request and response inin a YAML file.
"/api/v1/orders":
     post:
       consumes:
       -application/json
       produces:
       -application/json
       parameters:
       - in: body
         name: body
         description: order placed for Food
         required: true
         properties:
           foodId:
             type: integer
           shipDate:
             type: Date
           status:
             type: String
             enum:
             -placed
             - accepted
             -delivered
       responses:
         '200':
           description: successful operation
         '400':
           description: invalid order
At this point, the REST interface specification between FoodCome services is generated!
This specification defines the contract between the client and the server. If the customer wants to place an order, the client should send a request to the server api/v1/orders, which contains the food code, date, etc., and The server returns a HTTP 200 response if successful, and a HTTP 400 response if failed.
Asynchronous messages
After talking about REST, which is commonly used for synchronization, let’s analyze asynchronous messages.
What is an asynchronous message? The message is the data exchanged between the client and the server, and asynchronous refers to the method of calling. The client does not need to wait for the server to process the message before it can return. Wait for the server to finish processing and then notify the client.
Asynchronous messages can play a role in peak cutting and decoupling in the architecture of microservice clusters. For example, during the peak period of food ordering, FoodCome first takes the orders, puts them in the message queue, queues them up, and waits for the restaurants to process them one by one. Therefore, asynchronous messaging is a very common service interaction method in the industry. Its technical principle is message queue, and its technical implementation is message broker, including Kafka, RabbitMQ, etc.
When developers design microservices, they must first design an asynchronous message interface and define when and what kind of messages my microservice will put in the message queue. Likewise, the timing and method of obtaining information must also be defined.
Asynchronous message interface design
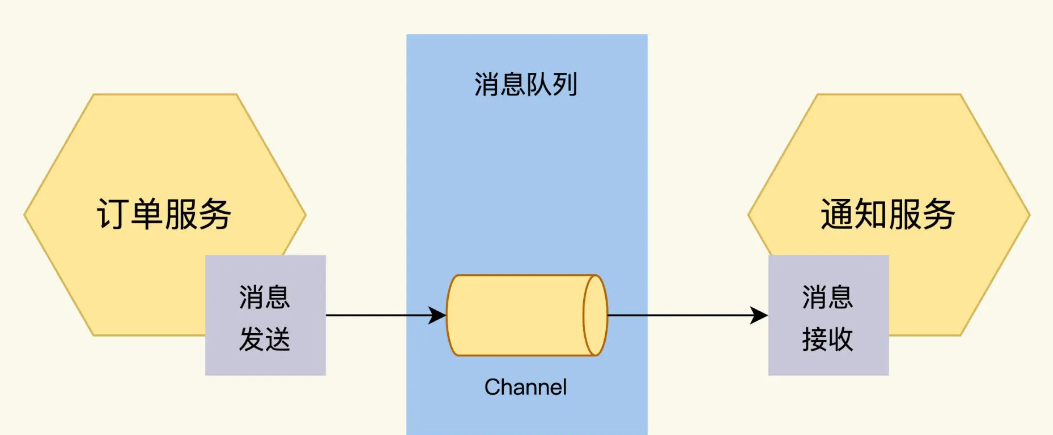
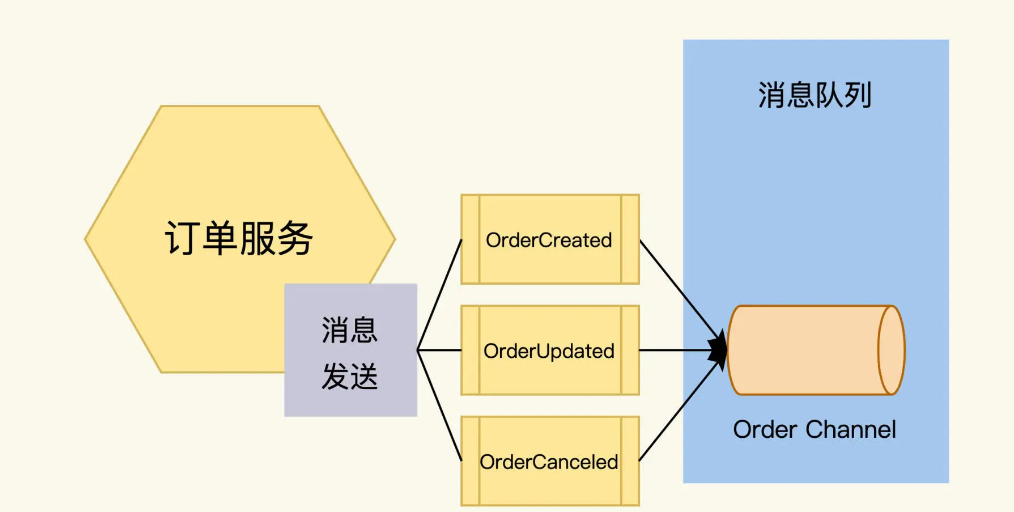
First, define the message body. The order service will send out three messages: OrderCreated, OrderUpdated, and OrderCancelled. The message contains fields such as order ID, order items, and order Status.
Secondly, it also needs to indicate which channel this message is sent to. Channel is a queue of messages. There can be multiple channels in a message broker, and each channel has different functions.
Because order messages have strict timing, for example, if the order of the two messages OrderCancelled and OrderCreated is reversed, it will cause confusion in program processing. Therefore, we send all three types of messages to a channel called order.
Asynchronous message interface specifications
Okay, here comes the key link. For testers, what we are most concerned about is the interface specification. Like REST, message queue also needs to find IDL to describe the information on the interface.
The mainstream IDL of RestAPI is OpenAPI, and correspondingly, the IDL of MessageAPI is AsyncAPI. The above Order message interface, defined using the AsyncAPI specification, will look like this:
asyncapi: 2.2.0
info:
   title: Order Service
   version: 0.1.0
channels:
   order:
     subscribe:
       message:
         description: Order created.
         payload:
           type: object
           properties:
             orderID:
               type: Integer
             orderStatus:
               type: string
This code describes that the order service will output the OrderCreated message to the Order channel when it is running. This OrderCreated message contains 2 fields, the order ID and the order status.
What to do when testing during the design phase?
We have just spent a lot of space analyzing API design. If you have only done testing before, you may be wondering: “These seem to be knowledge in the development field, are they beside the point?” In fact, what I want to say is that the API field is Development and testing are of common concern. Testers should actively participate in activities in these areas to make testing more effective.
I once saw two microservice teams developing very quickly, but as soon as the microservices went online, problems were discovered. Some of them were interfaces that were not compatible, some were inconsistent with data types, and other strange problems. These problems cost a lot of money. Not to mention the diagnosis time, it may even cause losses to the customer.
First, test design first principle
Test design first, what is needed is development design first. If you don’t do design during development, you won’t be able to design if you are anxious about testing. How to urge development and design to take precedence? A key indicator is whether it outputs interface specifications during the design phase. For development work, it is the development requirements that need to be implemented in code. For testing work, it is the test requirement, and test cases need to be written based on it.
**Second, find the appropriate IDL to express the interface design. **
A thorough and high-quality test requirement will be the beginning of successful testing. Therefore, this interface specification must not only exist, but also be standardized to guide us in generating test cases.
How to do it? Asking a developer to write a Word document? A thousand developers can write a thousand specifications. At this time, the value of IDL becomes apparent. It provides a set of specifications and syntax, like a special language, that can accurately describe the interface. And it has nothing to do with programming languages. It can be implemented in Java based on IDL, or it can be C++, JavaScript, Python, etc.
OpenAPI and AsyncAPI are two types of IDL family. Here is a list of common IDLs, so you can see what IDLs are in your field.
3KU Rule: Design a full-stack testing solution for a food ordering system
For a food ordering system, we organize the test requirements as follows:
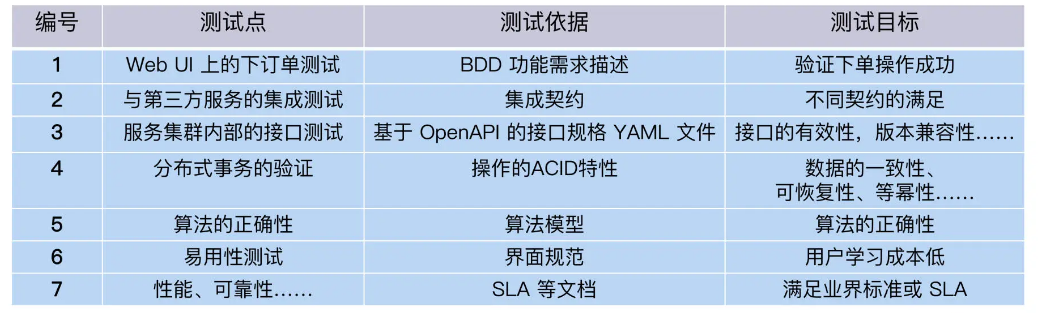
There are many other testing requirements for the food ordering system, such as compatibility, security, etc. Since the focus of this column is automated testing, I will not list them here.
Do you want to do automated testing?
After we have a documented list of test requirements, when we design an automated test plan, we need to first think clearly whether these requirements can be automated tested?
Testing the four-quadrant method can help us complete this thinking process effectively. The four quadrants of testing are the method model proposed by Bray Merrick: testing requirements are classified according to two dimensions: the nature and level of the requirements.
One dimension is the nature of the test requirements. Is it technical or business? In layman’s terms, if the demand is closer to the programmer’s thinking, such as algorithms, interfaces, transactions, etc., the more technical it is; and the closer it is to the user’s thinking, such as workflow, scenarios, etc., the more business-oriented it is. powerful.
Another dimension is the level of test requirements, that is, are the requirements critical or lean? You can understand it this way, critical requirements refer to explicit and important requirements for users. For example, a system must be able to place orders in order to be a food ordering system. Lean requirements refer to the implicit needs of users, which are not directly expressed, but may also be important, such as performance, reliability, etc.
Okay, after understanding the two dimensions of nature and level, we now use these two dimensions to go through the test requirements list and fill them into the quadrants.

Let’s first look at algorithms, interfaces, and distributed transaction testing. They are highly technical and are key requirements, so they are placed in the first quadrant. WebUI testing is highly business-oriented and a key requirement, so they are placed in the second quadrant. Usability testing is placed in the third quadrant. Of the three quadrants, performance and reliability are placed in the fourth quadrant.
For each quadrant, the four-quadrant testing method recommends the automated testing implementation strategy as follows:
- The testing requirements in the first quadrant are 100% automated;
- The testing requirements in the second quadrant are automation + manual;
- The testing requirements in the third quadrant are manual testing;
- Testing requirements in the fourth quadrant are executed through tools and frameworks, pursuing 0 code.
You don’t have to memorize the four-quadrant strategies by rote, because these are just appearances, and the underlying logic is still ROI. Once you learn the analysis ideas, you can also derive conclusions yourself.
For example, algorithm and interface testing in the first quadrant, because they verify key functions, have high regression testing, and the benefits of automated testing will be large. The strong technical nature means that this type of test will not be greatly affected by business changes, so the cost of development and maintenance is low. Therefore, the testing requirements of Quadrant 1 can be 100% automated. As for the situation in other quadrants, you can try to deduce it yourself, which is also consistent with the law of ROI.
At which level should automated testing be done?
After determining the testing method, we need to further consider, at which level should the automated testing of these test requirements be implemented? In unit testing, interface testing or UI automation testing?
In the second lecture of the column, we have studied the 3KU test matrix and 3KU test pyramid, so we can apply them to FoodCome’s automated test design.
Excluding the manual test items mentioned in the previous table, we fill in the remaining content into the 3KU test matrix.
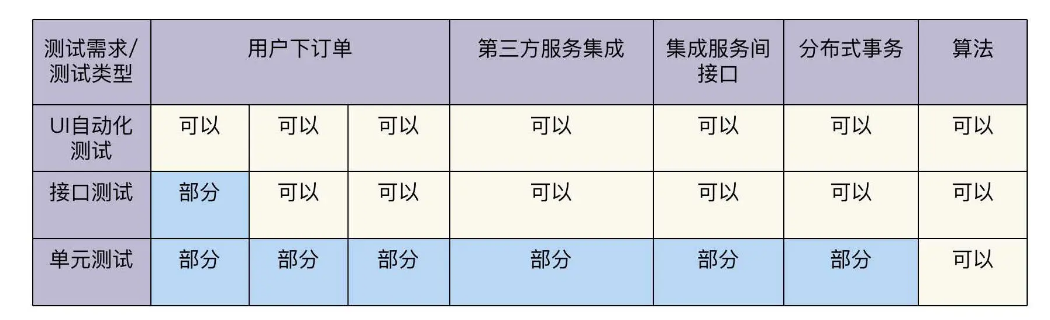
In accordance with the implementation-level principle of seeking maximum ROI in automated testing, we convert the above table into an ROI automated testing pyramid.

What tools are used for automated testing?
Choosing the right tools and frameworks will make automated testing more efficient. What this “choosing the right” means is that the tool must be suitable for your project and your team.
- In UI testing with a small workload, the stability of the tool is the most important, followed by the pursuit of efficiency
- In unit testing and interface testing with heavy workload, choose tools that are mature and support modular development.
Run automated tests
In the automated testing plan, in addition to whether to do automated testing, and at what level. Another thing we need to consider clearly is when the automated tests are run after they are developed.
When we talk about ROI, we often mention the benefits of an automated test, and one of its important factors is the number of times it is run. Therefore, it is critical to design automated test running scenarios with high ROI, and the software deployment pipeline Deployment Pipeline is one of the important automated test running scenarios.
So how is the Deployment Pipeline designed? Let’s start with the concept. In 2010, Jez Humble published the book “Continuous Delivery”, where he proposed the concept of deployment pipeline:
“The deployment pipeline is the automated process by which code moves from a developer’s PC to a production environment.”
Why is it called a pipeline? Because the deployment pipeline consists of a series of test stages, each stage is connected end to end, forming a pipeline like an assembly line.
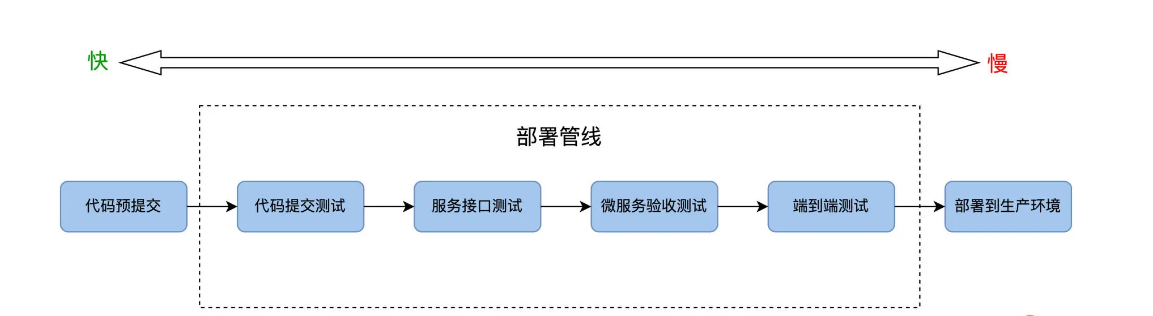
We fill FoodCome’s automated testing tasks into each stage of the deployment pipeline, as shown in the following figure:
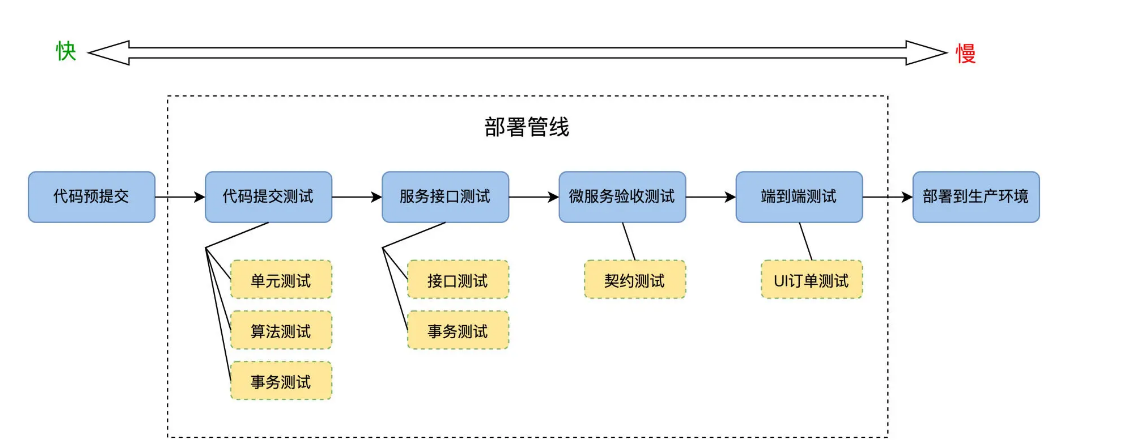
Along the release direction of the deployment pipeline, that is, from left to right, the running speed of automated tests changes from fast to slow, and the ROI also goes from high to low. The closer to the code, the more frequent the activities, the higher the ROI. However, there will be failures at every level. In the end, only a small number of people can successfully reach the deployable production environment. Ten code changes can reach the production environment twice.
This is also very clever for the design in Actions, whether it is executed in parallel or sequentially.
unit test
Unit testing is the most basic test, the test with the highest ROI, and the highest input-output ratio.
Now the developer of the Order service wants to test whether the code he wrote works as expected. The first thing he thinks of may be to build and run the Order service and send it HTTP Request "POST /api/v1/orders" , and then check the returned Response content to see if the order has been generated as scheduled.
Of course, this method can also achieve the testing goal, but after you have learned the 3KU principle, you can ask the developer a question, “Can the same verification goal be achieved in the unit testing phase with a higher ROI?”
Develop unit testing strategy
For example, for an order system (Order).
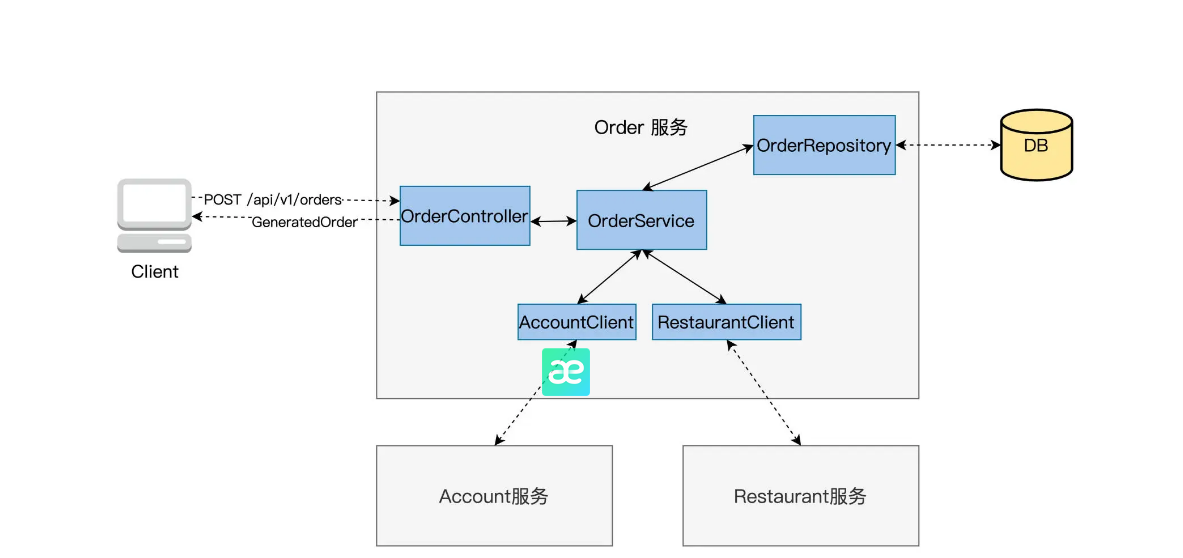
Let’s first look at the blue color block in the picture. The Order service can be implemented through these five classes.
Their division of labor is as follows: OrderController receives the POST /api/v1/orders" request sent by the Client, passes it to the OrderService createOrder method for processing, and then encapsulates the generated order information into a Response and returns it to the Client;
OrderService is the main business logic class. Its createOrder completes all the work of creating an order, calculating prices, discount deductions, calling AccountClient for payment verification, and calling RestaurantClient for restaurant inventory checking. After the order is generated, it is handed over to OrderRepository to write DB to generate order records.
OrderRepository implements interaction with Order’s own database, reading and writing operations.
Knowing this, we can’t start writing unit test code right away. We still need to consider the following things clearly.
How many Test Classes need to be written?
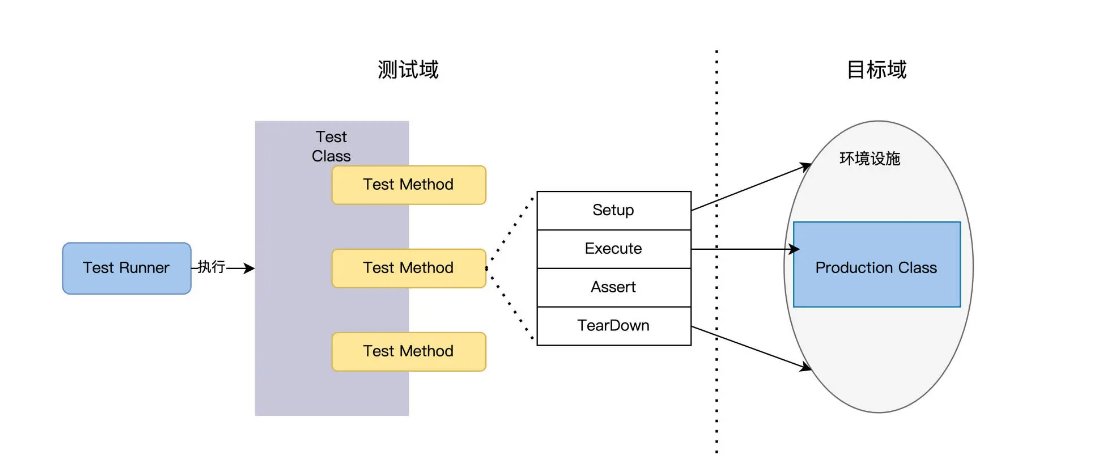
Here I need to explain some background knowledge, that is, what is the “unit” in unit testing?
If you ask different developers, you may get very different answers. In procedural languages, such as C and scripting languages, the unit should be a function, and the unit test is to call this function and verify its output. In object-oriented languages, C++ or Java, the unit is a Production Class.
The FoodCome system is developed using the Java object-oriented language and contains 5 Production Classes. For unit testing, we set the rules to be simpler and develop a Test Class to test a Production Class to maintain a one-to-one relationship.
As shown in the figure below, a Test Class has multiple Test Methods. Each Method will Setup to establish the context of the Production Class, Execute to call the Method of the Production Class, Assert to verify the output, and TearDown to destroy the context.
Isolated or social?
package main

import (
"testing"
"github.com/stretchr/testify/mock"
"github.com/stretchr/testify/assert"
)

//Define simulation object
type MockOrderRepository struct {
mock.Mock
}

type MockAccountClient struct {
mock.Mock
}

type MockRestaurantClient struct {
mock.Mock
}

func TestOrderService(t *testing.T) {
//Initialize mock object
orderRepository := new(MockOrderRepository)
accountClient := new(MockAccountClient)
restaurantClient := new(MockRestaurantClient)

//Create OrderService instance
orderService := NewOrderService(orderRepository, accountClient, restaurantClient)

// Define the input and expected output of the test case
orderDetails := &OrderDetails{
// ... initialize order details ...
}

// Define the desired behavior of the mock object
	// For example:
// accountClient.On("SomeMethod", someInput).Return(someOutput)

//Execute test case
err := orderService.CreateOrder(orderDetails)

// Assert test results
assert.Nil(t, err, "Error should be nil")

// Verify that all expected behaviors of the mock object are invoked
orderRepository.AssertExpectations(t)
accountClient.AssertExpectations(t)
restaurantClient.AssertExpectations(t)
}
Note: Here we use the two packages github.com/stretchr/testify/assert and github.com/stretchr/testify/mock to assist us in asserting and mocking object operations. You need to use Go’s package management tools (such as Go Modules) to obtain these two dependencies.
In this basic example you can:
- Use the
Mockstructure to simulate the services thatOrderServicedepends on. - Use the
OnandReturnmethods to define the desired behavior of the mock object. - Use the
AssertExpectationsmethod to check whether the expected behaviors of the mock object are all invoked. - Use the
assertfunction for assertion checking.
In Go language unit testing, we can implement functions similar to JUnit @DataProvider through table-driven tests. In this way, we can test a function with a set of test cases without having to write a separate test function for each test case. This is also a very common pattern in Go testing.
The following Go code example shows how to use table-driven testing to test a function named determineFinalPrice (assuming that this function belongs to a structure named OrderService and receives a parameter named OrderDetails and returns a final price). Also, given the complexity of the coupon and price calculations you mentioned, these test cases will likely include a wide variety of inputs and expected outputs. Specific test logic and assertions may require you to adjust them based on the actual business logic.
Here is an example of a unit test implemented in Go:
package main

import (
"testing"
"github.com/stretchr/testify/assert"
)

type OrderDetails struct {
// ... specific fields and types ...
}

type OrderService struct {
// ...other dependencies and fields ...
}

func (os *OrderService) determineFinalPrice(details *OrderDetails) float64 {
// ...implement the logic of price calculation ...
}

func TestDetermineFinalPrice(t *testing.T) {
// Initialize the OrderService instance (if there are dependencies, you may need to use a mock object)
orderService := &OrderService{
// ... initialize fields and dependencies ...
}

//Define a set of test cases
tests := []struct {
name string //The name of the test case
input OrderDetails // input data
expectedPrice float64 // expected price
}{
{
name: "test case 1",
input: OrderDetails{
// ...initialize test data ...
},
expectedPrice: 100.0,
},
{
name: "test case 2",
input: OrderDetails{
// ...initialize test data ...
},
expectedPrice: 200.0,
},
// ... more test cases ...
}

// Traverse and run test cases
for _, tt := range tests {
t.Run(tt.name, func(t *testing.T) {
actualPrice := orderService.determineFinalPrice(&tt.input)
assert.Equal(t, tt.expectedPrice, actualPrice)
})
}
}
In the above code:
- We define a slice of test cases (
tests), each test case includes name, input data and expected output. - We use the
t.Run()function to execute a subtest for each test case, so that we can clearly see the running results of each test case. - We use the
assert.Equal()function to assert whether the actual output and the expected output are equal.
You may need to adjust the definition of the OrderDetails structure and the determineFinalPrice function according to your actual business logic.
Improve unit testing ROI
Since unit testing is good and fast, we might as well move some laborious testing work to this layer. Which tests are more troublesome?
The online shopping scene is very typical. You must have used coupons when shopping online. The conditions for using these coupons are very complicated: you need to know at what time and what discount will be given for which products, and the coupons can also be used in a superimposed manner. , and there are all kinds of rules that can make people dizzy. But users can be confused, but the platform cannot be confused. After using coupons, the final result must be very accurate to ensure profits and no losses.
If you test coupons at the UI level, you need to repeatedly run a large amount of test data to generate different discount conditions, which is expensive.
If placed in a unit test, this TestCase will be easy to understand. The determineFinalPrice method in OrderService is responsible for price calculation. In determineFinalPrice, various preferential conditions and rules need to be considered and calculated, and then a final price needs to be output.
How to write good unit tests in Go languageHow to write good unit tests?
First, learn to write test cases. For example, how to test a single function/method; such as how to do benchmark testing; such as how to write concise and concise test code; and how to mock when encountering method calls such as database access.
Then, write testable code. High cohesion, low coupling is the principle of software engineering. Similarly, for testing, the difficulty of testing is also different if the function/method is written differently. Functions with single responsibilities, simple parameter types, and low coupling with other functions are often easier to test. We often say, “This kind of code cannot be tested.” In this case, we have to think about whether the way the function is written can be changed better. It pays to refactor to make your code testable.
And it is worth noting that the Go language recommends putting the test files and source code files of unit tests together.
Test files end with _test.go. For example, the current package has a file calc.go, and we want to test the Add and Mul functions in calc.go, then we should create a new calc_test.go as a test file.
example/
    |--calc.go
    |--calc_test.go
If the code of calc.go is as follows:
package main

func Add(a int, b int) int {
     return a + b
}

func Mul(a int, b int) int {
     return a * b
}
Then the test case in calc_test.go can be written like this:
package main

import "testing"

func TestAdd(t *testing.T) {
if ans := Add(1, 2); ans != 3 {
t.Errorf("1 + 2 expected be 3, but %d got", ans)
}

if ans := Add(-10, -20); ans != -30 {
t.Errorf("-10 + -20 expected be -30, but %d got", ans)
}
}
- The test case name is generally named
Testplus the name of the method to be tested. - There is only one parameter for testing, here it is
t *testing.T. - The parameter of benchmark is
*testing.B, and the parameter of TestMain is of type*testing.M.
Run go test and all test cases under the package will be executed.
$ go test
OK example 0.009s
Or go test -v, the -v parameter will display the test results of each use case, and the -cover parameter can view the coverage.
$ go test -v
=== RUN TestAdd
--- PASS: TestAdd (0.00s)
=== RUN TestMul
--- PASS: TestMul (0.00s)
PASS
OK example 0.007s
If you only want to run one of the test cases, such as TestAdd, you can specify it with the -run parameter, which supports the wildcard character * and some regular expressions, such as ^ and $.
$ go test -run TestAdd -v
=== RUN TestAdd
--- PASS: TestAdd (0.00s)
PASS
OK example 0.007s
Subtests
Subtests are built-in supported by the Go language. In a certain test case, you can use t.Run to create different subtest cases according to the test scenario:
In Go language testing, subtests are a strategy that can break down a large test into several small test units. This approach allows us to define multiple logically independent test cases within a single test function, and each case can be run and verified independently. Each subtest is executed through the
t.Runfunction and has its own test name (usually describing the purpose of the test or input data) and test logic.
- Table-Driven Tests
Subtests are useful when we want to test a function using multiple sets of input data. We can define a table (usually a slice of structs) that contains multiple sets of input data and desired outputs, and then use a loop to iterate over each row in the table and generate a subtest for each row.
func TestFunction(t *testing.T) {
tests := []struct {
name string
input int
expected int
}{
{"case 1", 1, 2},
{"case 2", 3, 4},
// ...
}
for _, tt := range tests {
t.Run(tt.name, func(t *testing.T) {
// Test logic
})
}
}
Using this approach, we can easily add more test cases without writing a new test function for each case.
- Organize and reuse test logic
Subtests can also be used to organize test logic. We can group together a group of related test cases and keep each test case independent while sharing some setup and teardown code.
func TestProcess(t *testing.T) {
// Some setup code...
t.Run("Subtest1", func(t *testing.T) {
// Test logic 1
})
t.Run("Subtest2", func(t *testing.T) {
// Test logic 2
})
// Some teardown code...
}
Here “Subtest1” and “Subtest2” are subtests. They share the setup and teardown code of the external
TestProcess, but execute their own test logic.
- Parallel Test
Subtests also allow us to easily parallelize tests. By calling
t.Parallel()in a subtest, we can make the tests run concurrently, which is very useful when executing a set of time-consuming integration tests.func TestParallel(t *testing.T) { tests := []struct { name string // ... }{ {"case 1"}, {"case 2"}, // ... } for _, tt := range tests { tt := tt // capture range variable t.Run(tt.name, func(t *testing.T) { t.Parallel() // marks T as capable of running in parallel // Test logic }) } }
//calc_test.go

func TestMul(t *testing.T) {
t.Run("pos", func(t *testing.T) {
if Mul(2, 3) != 6 {
t.Fatal("fail")
}

})
t.Run("neg", func(t *testing.T) {
if Mul(2, -3) != -6 {
t.Fatal("fail")
}
})
}
- In the previous example,
t.Error/t.Errorfwas used when the test failed. In this example,t.Fatal/t.Fatalfis used. The difference is that the former will not stop when encountering an error and will continue to execute other test cases. Stop when you make a mistake.
Run a subtest of a test case:
$ go test -run TestMul/pos -v
=== RUN TestMul
=== RUN TestMul/pos
--- PASS: TestMul (0.00s)
     --- PASS: TestMul/pos (0.00s)
PASS
OK example 0.008s
For scenarios with multiple sub-tests, the following writing method (table-driven tests) is more recommended:
//calc_test.go
func TestMul(t *testing.T) {
cases := []struct {
Name string
A, B, Expected int
}{
{"pos", 2, 3, 6},
{"neg", 2, -3, -6},
{"zero", 2, 0, 0},
}

for _, c := range cases {
t.Run(c.Name, func(t *testing.T) {
if ans := Mul(c.A, c.B); ans != c.Expected {
t.Fatalf("%d * %d expected %d, but %d got",
c.A, c.B, c.Expected, ans)
}
})
}
}
Data for all use cases is organized in slices cases, which looks like a table, with the help of loops to create subtests. The advantages of writing this way are:
- Adding new use cases is very simple, just add a piece of test data to cases.
- The test code is very readable, and you can intuitively see the parameters and expected return values of each sub-test.
- When a use case fails, the format of the error message is relatively uniform and the test report is easy to read.
Helpers
Extracting some repetitive logic as public helpers can increase the readability and maintainability of the test code. With the help of helper functions, the main logic of the test case can be made clearer.
For example, we can extract the logic for creating subtests:
//calc_test.go
package main

import "testing"

type calcCase struct{ A, B, Expected int }

func createMulTestCase(t *testing.T, c *calcCase) {
//t.Helper()
if ans := Mul(c.A, c.B); ans != c.Expected {
t.Fatalf("%d * %d expected %d, but %d got",
c.A, c.B, c.Expected, ans)
}

}

func TestMul(t *testing.T) {
createMulTestCase(t, &calcCase{2, 3, 6})
createMulTestCase(t, &calcCase{2, -3, -6})
createMulTestCase(t, &calcCase{2, 0, 1}) // wrong case
}
Here, we deliberately created an incorrect test case and ran go test. If the test case fails, the file and line number information where the error occurred will be reported:
$ go test
--- FAIL: TestMul (0.00s)
     calc_test.go:11: 2 * 0 expected 1, but 0 got
FAIL
exit status 1
FAIL example 0.007s
As you can see, the error occurs on line 11, which is inside the helper function createMulTestCase. This method was called on lines 18, 19, and 20. We were not able to determine which line the error occurred at the first time. Some help functions may also be called in different functions, and the error messages are all in the same place, making it inconvenient to locate the problem. Therefore, the Go language introduced t.Helper() in version 1.9, which is used to mark the function as a helper function. When an error is reported, the information of the helper function caller will be output, rather than the internal information of the helper function.
Modify createMulTestCase and call t.Helper()
func createMulTestCase(c *calcCase, t *testing.T) {
     t.Helper()
t.Run(c.Name, func(t *testing.T) {
if ans := Mul(c.A, c.B); ans != c.Expected {
t.Fatalf("%d * %d expected %d, but %d got",
c.A, c.B, c.Expected, ans)
}
})
}
Run go test and the error message is as follows. It can be clearly seen that the error occurred on line 20.
$ go test
--- FAIL: TestMul (0.00s)
     calc_test.go:20: 2 * 0 expected 1, but 0 got
FAIL
exit status 1
FAIL example 0.006s
2 suggestions for helper functions:
- Do not return errors. Just use
t.Errorort.Fataldirectly inside the help function. The readability will not be affected by too many error handling codes in the main logic of the use case. - Call
t.Helper()to make the error message more accurate and help with location.
setup and teardown
If the logic before and after running each test case is the same in the same test file, it will usually be written in the setup and teardown functions. For example, the object to be tested needs to be instantiated before execution. If the object is complex, it is suitable to extract this part of the logic; after execution, some resource recovery work may be done, such as closing network connections, releasing files, etc. The standard library testing provides such a mechanism:
func setup() {
fmt.Println("Before all tests")
}

func teardown() {
fmt.Println("After all tests")
}

func Test1(t *testing.T) {
fmt.Println("I'm test1")
}

func Test2(t *testing.T) {
fmt.Println("I'm test2")
}

func TestMain(m *testing.M) {
setup()
code := m.Run()
teardown()
os.Exit(code)
}
- In this test file, there are 2 test cases,
Test1andTest2. - If the test file contains the function
TestMain, the generated test will call TestMain(m) instead of running the test directly. - Call
m.Run()to trigger the execution of all test cases, and useos.Exit()to process the returned status code. If it is not 0, it means the use case failed. - Therefore, some additional preparation (setup) and recycling (teardown) work can be done before and after calling
m.Run().
Executing go test will output
$ go test
Before all tests
I'm test1
I'm test2
PASS
After all tests
OK example 0.006s
###TCP/HTTP
Suppose you need to test that the handler of an API interface can work normally, such as helloHandler
func helloHandler(w http.ResponseWriter, r *http.Request) {
w.Write([]byte("hello world"))
}
Then we can create a real network connection for testing:
// test code
import (
"io/ioutil"
"net"
"net/http"
"testing"
)

func handleError(t *testing.T, err error) {
t.Helper()
if err != nil {
t.Fatal("failed", err)
}
}

func TestConn(t *testing.T) {
ln, err := net.Listen("tcp", "127.0.0.1:0")
handleError(t, err)
defer ln.Close()

http.HandleFunc("/hello", helloHandler)
go http.Serve(ln, nil)

resp, err := http.Get("http://" + ln.Addr().String() + "/hello")
handleError(t, err)

defer resp.Body.Close()
body, err := ioutil.ReadAll(resp.Body)
handleError(t, err)

if string(body) != "hello world" {
t.Fatal("expected hello world, but got", string(body))
}
}
net.Listen("tcp", "127.0.0.1:0"): Listen to an unoccupied port and return Listener.- Call
http.Serve(ln, nil)to start the http service. - Use
http.Getto initiate a Get request and check whether the return value is correct. - Try not to use mocks for the
httpandnetlibraries, so that more realistic scenarios can be covered.
httptest
For http development scenarios, it is more efficient to use the standard library net/http/httptest for testing.
The above test case is rewritten as follows:
// test code
import (
"io/ioutil"
"net/http"
"net/http/httptest"
"testing"
)

func TestConn(t *testing.T) {
req := httptest.NewRequest("GET", "http://example.com/foo", nil)
w := httptest.NewRecorder()
helloHandler(w, req)
bytes, _ := ioutil.ReadAll(w.Result().Body)

if string(bytes) != "hello world" {
t.Fatal("expected hello world, but got", string(bytes))
}
}
Use httptest to simulate the request object (req) and response object (w) to achieve the same purpose.
Benchmark benchmark test
The benchmark test case is defined as follows:
func BenchmarkName(b *testing.B){
     // ...
}
- The function name must start with
Benchmark, followed by the name of the function to be tested. - The parameter is
b *testing.B. - When executing benchmark tests, you need to add the
-benchparameter.
For example:
func BenchmarkHello(b *testing.B) {
     for i := 0; i < b.N; i++ {
         fmt.Sprintf("hello")
     }
}
$ go test -benchmem -bench .
...
BenchmarkHello-16 15991854 71.6 ns/op 5 B/op 1 allocs/op
...
The meaning of each column value in the benchmark report is as follows:
typeBenchmarkResult struct {
     N int //Number of iterations
     T time.Duration // The time spent in the benchmark test
     Bytes int64 // Number of bytes processed in one iteration
     MemAllocs uint64 //The total number of memory allocations
     MemBytes uint64 //The total number of bytes of allocated memory
}
If the benchmark requires some time-consuming configuration before running, you can use b.ResetTimer() to reset the timer first, for example:
func BenchmarkHello(b *testing.B) {
     ... // Time-consuming operation
     b.ResetTimer()
     for i := 0; i < b.N; i++ {
         fmt.Sprintf("hello")
     }
}
Use RunParallel to test concurrency performance
func BenchmarkParallel(b *testing.B) {
templ := template.Must(template.New("test").Parse("Hello, {{.}}!"))
b.RunParallel(func(pb *testing.PB) {
var buf bytes.Buffer
for pb.Next() {
// All goroutines together, the loop is executed a total of b.N times
buf.Reset()
templ.Execute(&buf, "World")
}
})
}
The test is as follows:
$ go test -benchmem -bench .
...
BenchmarkParallel-16 3325430 375 ns/op 272 B/op 8 allocs/op