Task Assignment
time:Within a week
- Complete first contribute, purpose: to understand the contribution process of open source projects
- Complete the construction of sealos development environment
- Understand the basic usage, core concepts, and functions of core components of kuberentes
- Basic usage:
- Create a pod and understand what a pod is
- Create a deployment and understand the relationship between deployment and pod
- Create a configmap and understand how to mount configuration files to pods
- Create a service and access pods in the cluster through service
- Core concepts and functions of core components:
- kubectl apiserver controller-manager scheduler kubelet kube-proxy etcd What do these components do?
- You can use a kubectl apply and a deployment to sort out what these components have done respectively.
🚸 Next time: A specific task will be assigned and the sealos source code architecture will be introduced.
Resources 🗓️
Reference:
Contribution documents: https://github.com/labring/sealos/blob/main/CONTRIBUTING.md
Development environment construction document: https://github.com/labring/sealos/blob/main/DEVELOPGUIDE.md
Use sealos to quickly build kubernetes learning environment documents: https://github.com/labring/sealos#quickstart Just build a stand-alone environment.
Kubernetes introductory documentation: https://kubernetes.io/docs/tutorials/kubernetes-basics/ Skip the installation part and use sealos directly. key build.
⚠️ Note: Don’t be afraid of harassing fanux if there are any problems during the process. It is important to take the initiative to ask questions. Questions are also very welcome in the incubation communication group.
Contribute documentation
For security issues discovered, it is recommended to notify admin@sealyun.com by sending an email
For general issues, maybe you can choose [issues](New Issue · labring/sealos (github.com)) to point out the problem
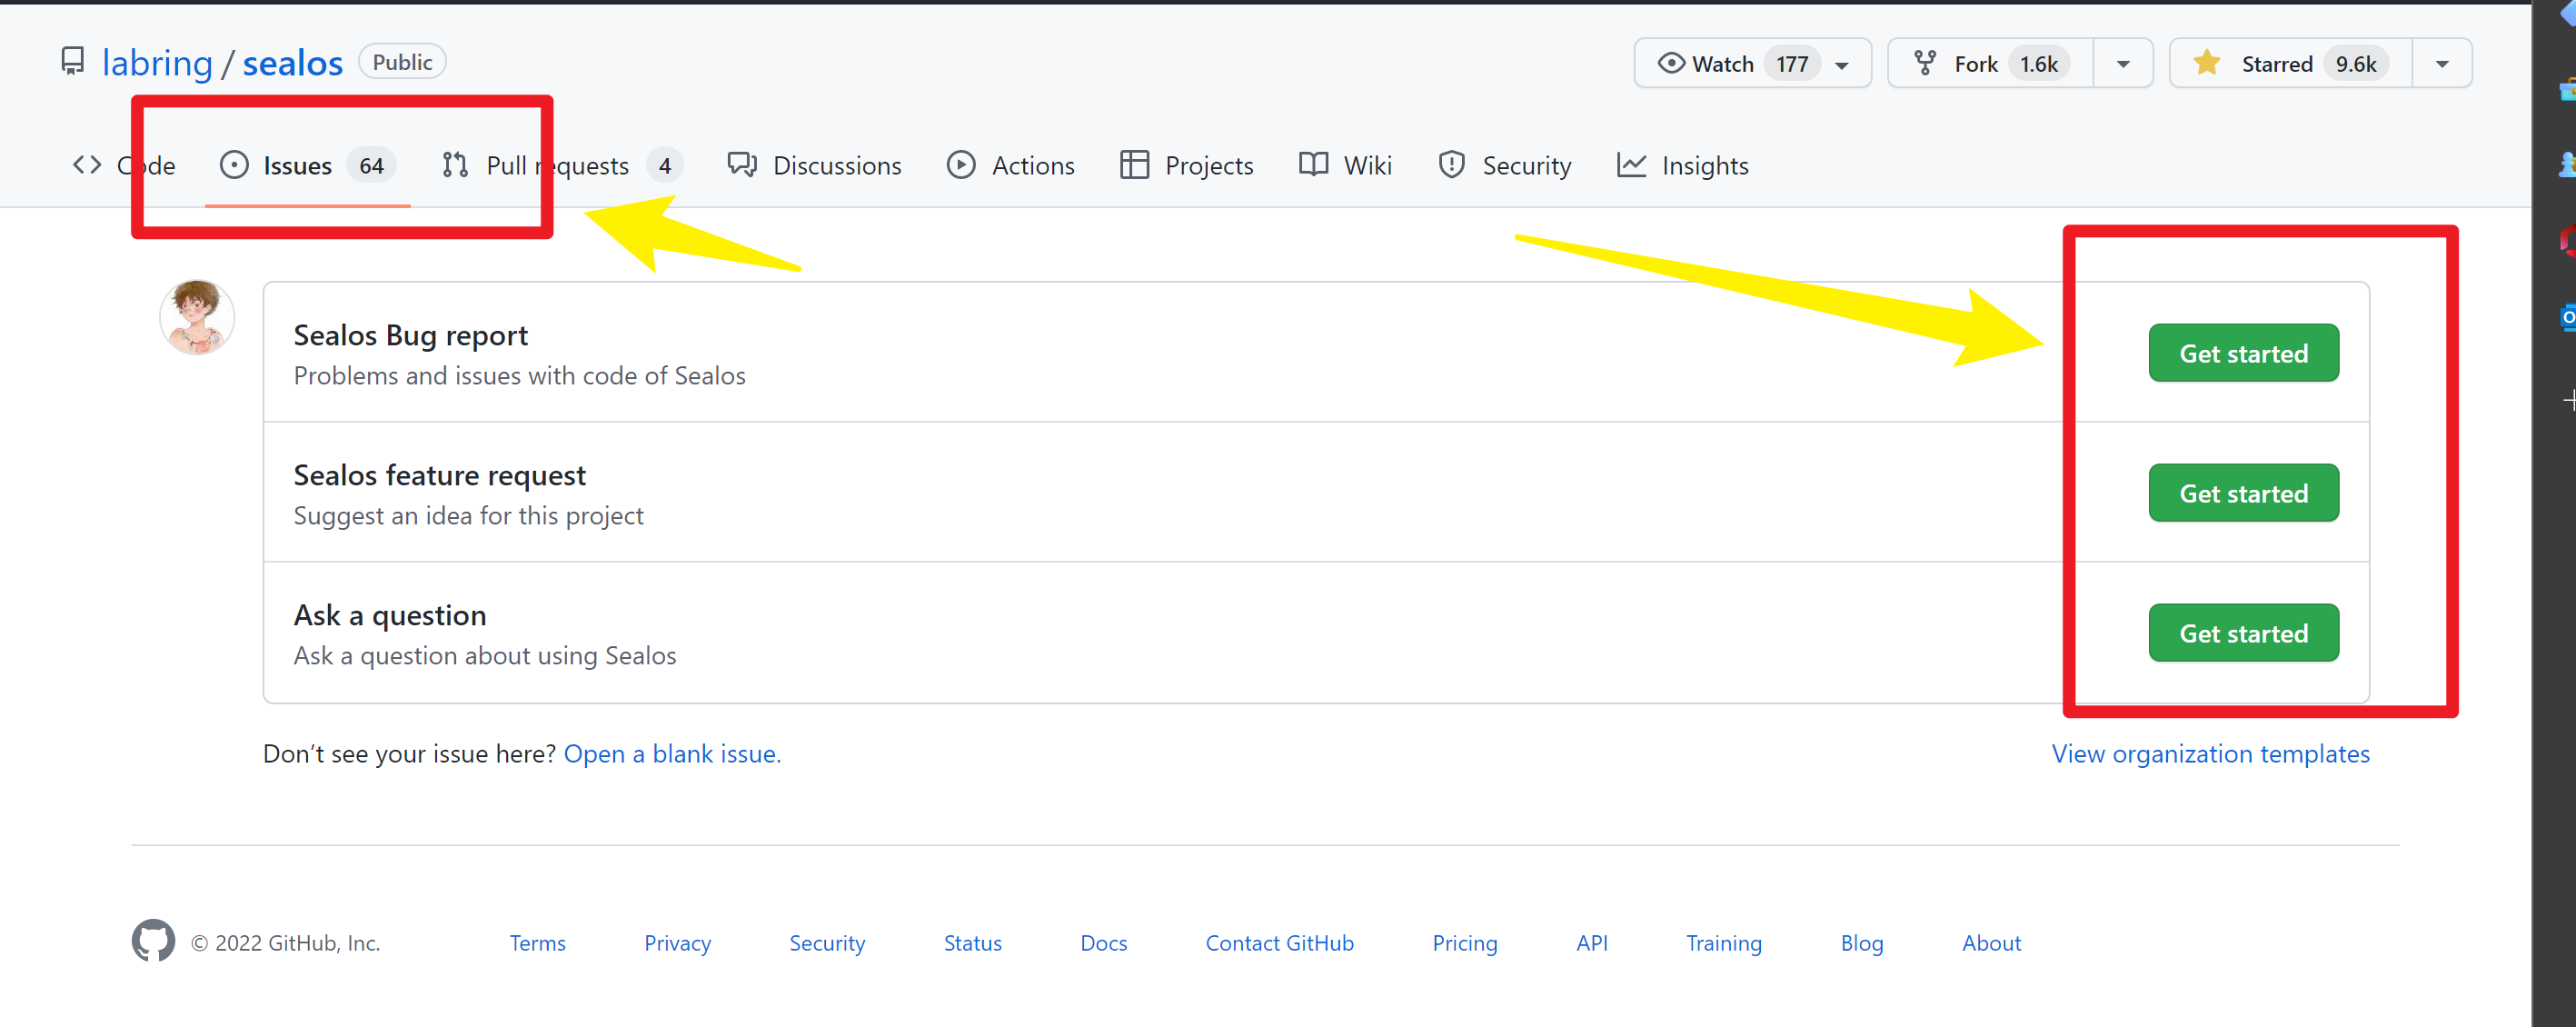
⚡ Obviously, I prefer pr to issues, you can find the following problems and improve them
- If you find a spelling mistake, try to fix it!
- If you find a bug, try to fix it!
- If you find some redundant code, try deleting them!
- If you find some test cases missing, try adding them!
- If you can enhance a feature, don’t hesitate!
- If you find that code is implicit, try adding comments to make it clear!
- If you think the code is ugly, try refactoring it!
- If you can help improve the documentation, that would be great!
- If you find a document that is incorrect, just fix it!
- .…..
🧷 Additional reading
- How to participate in the github project, you may refer to this article~
- How to use actions automatic deployment to achieve automatic remote updates~
💡 Steps
⬇️ The general process is as follows:
First fork this repository to your repository on Github
git clone clone to local
Modify the corresponding code locally
git push to your own warehouse
Perform pull request operations in your own warehouse
Documentation specifications
Format
Please follow the rules below to format your document better, which will greatly improve the reading experience.
- Please do not use Chinese punctuation marks in English documents and vice versa.
- Please use capital letters where applicable, such as the first letter of a sentence/title, etc.
- Please specify a language for each Markdown code block unless there is no associated language.
- Please insert spaces between Chinese and English words.
- Please use the correct capitalization of technical terms, such as HTTP instead of http, MySQL instead of mysql, Kubernetes instead of kubernetes, etc.
- Please check the document for any spelling errors before submitting a PR.
You can also check out docusaurus to write documentation with richer features.
**1. Set “Remote Upstream” to **Use the following two commands: https://github.com/labring/sealos.git
git remote add upstream https://github.com/labring/sealos.git
git remote set-url --push upstream no-pushing
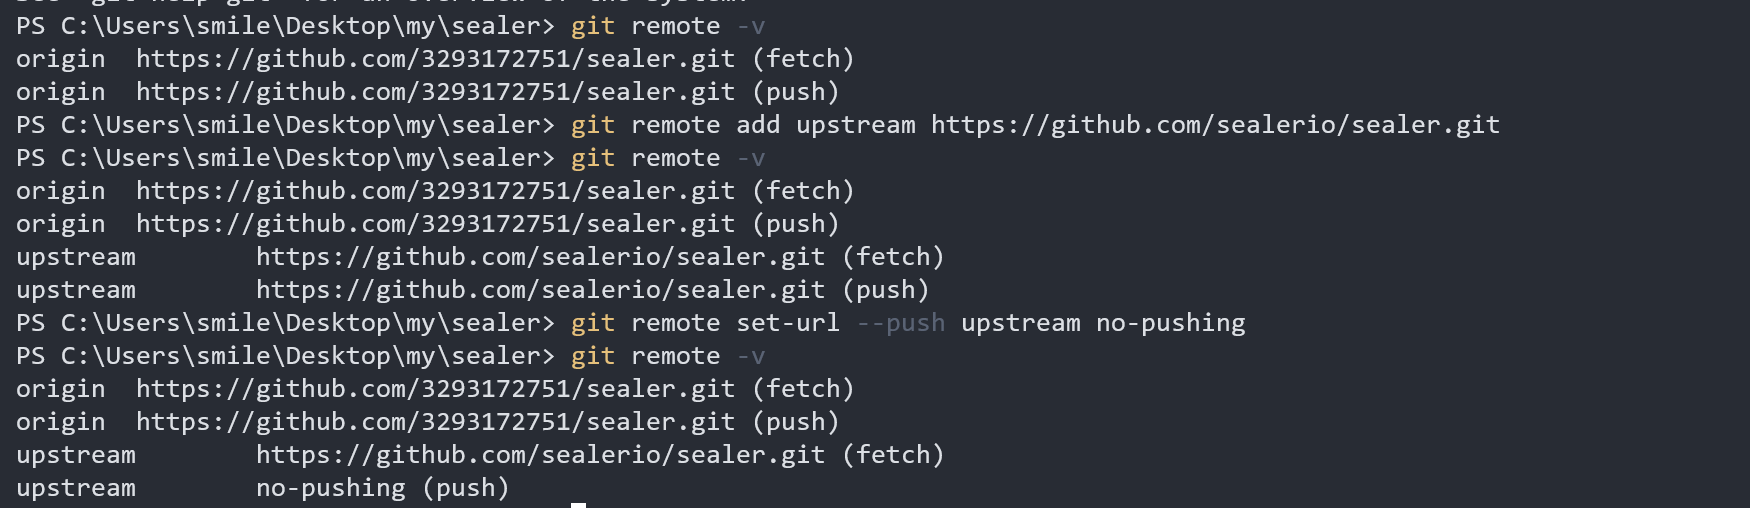
With this remote setup, you can check the git remote configuration like this:
$ git remote -v
origin https://github.com/<your-username>/sealos.git (fetch)
origin https://github.com/<your-username>/sealos.git (push)
upstream https://github.com/labring/sealos.git (fetch)
upstream no-pushing (push)
Adding this we can easily synchronize our local branch with the upstream branch.

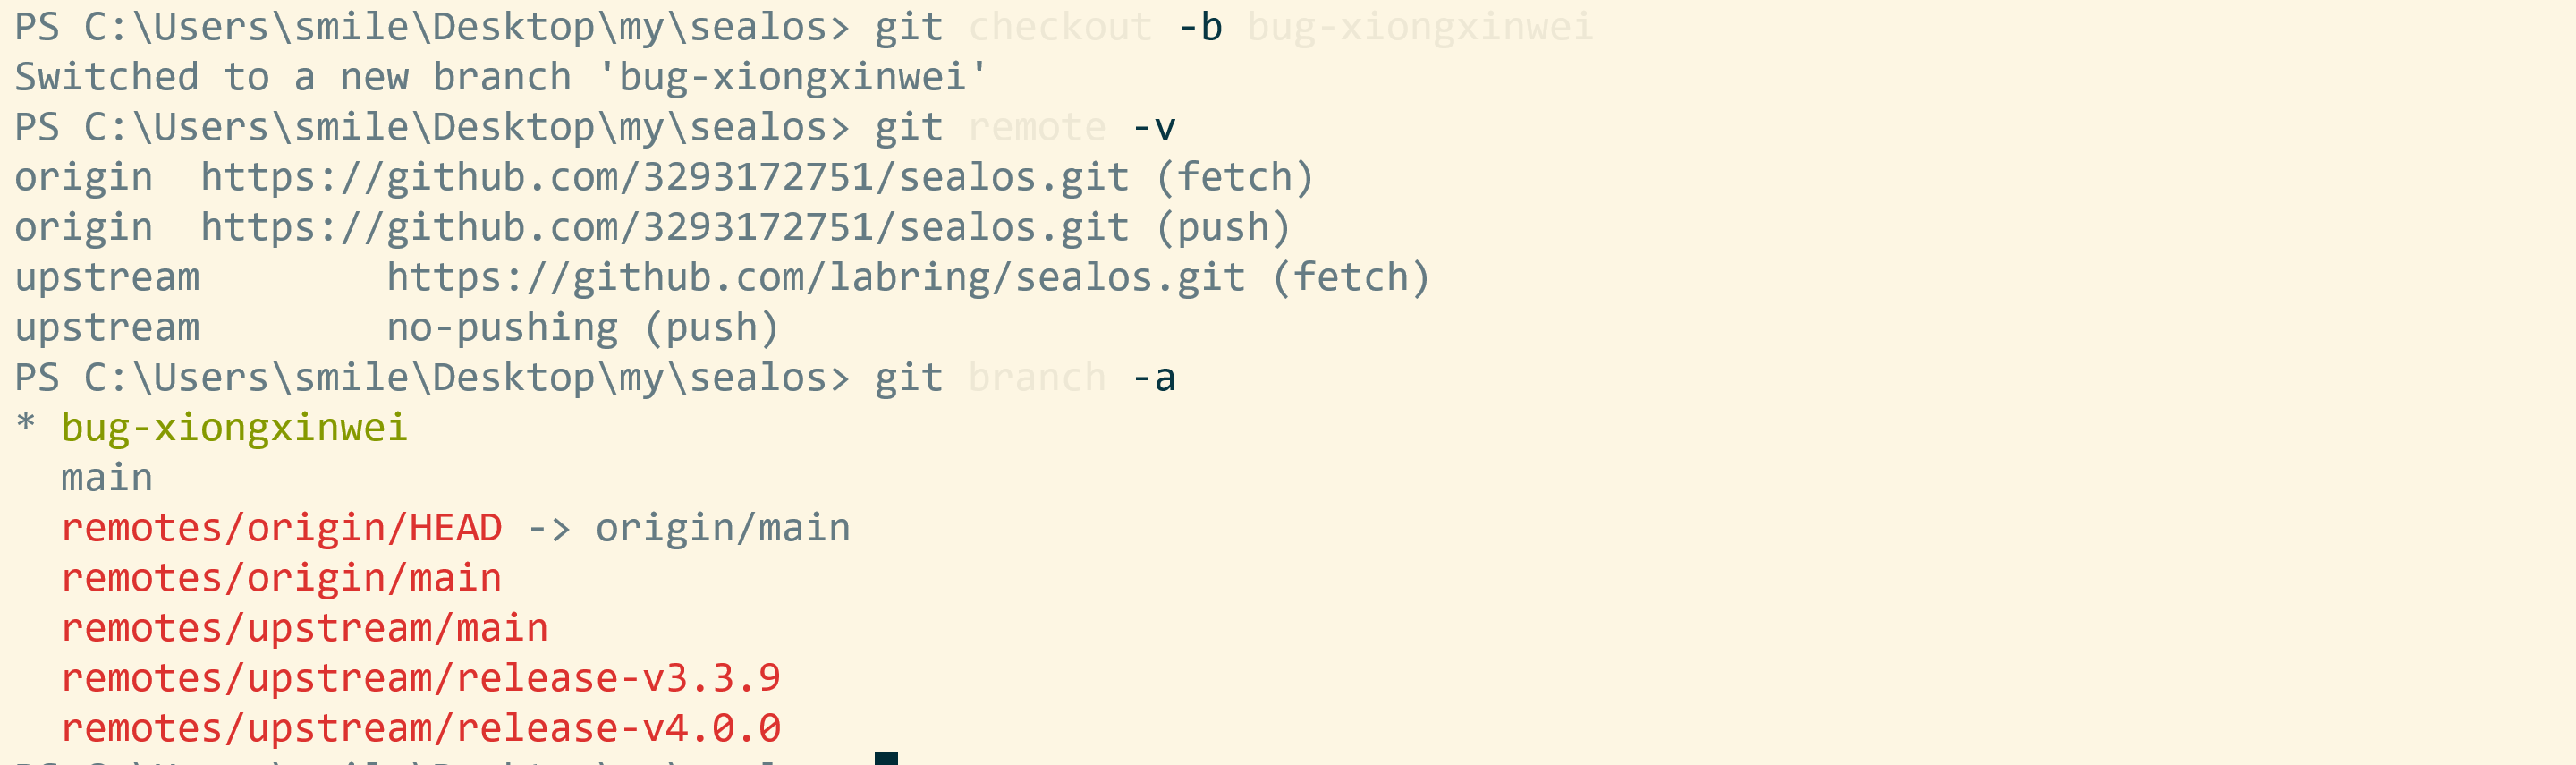
2. Create a branch to add new features or fix issues
Update the local working directory and the remote forked repository:
It is recommended to use
fetch: From a security perspective,git fetchis safer thangit pull, because we can first compare the differences between local and remote, and then selectively merge.
cd sealos
git fetch upstream
git checkout main
git rebase upstream/main
git push # default origin, update your forked repository
Create new branch:
git checkout -b bug-xiongxinwei
Make any changes to the code and then build and test it. new-branch
Recommended naming convention:
``asciiarmor Branch: Name: Description:
Master branch master master branch, all official versions provided to users are released on this master branch Development branch dev development branch is always the branch with the latest and most complete functions Function branch feature-* new function branch, a certain function point is under development Release version release-* releases functions that will be launched regularly Fix branch bug-* Fix bug in online code
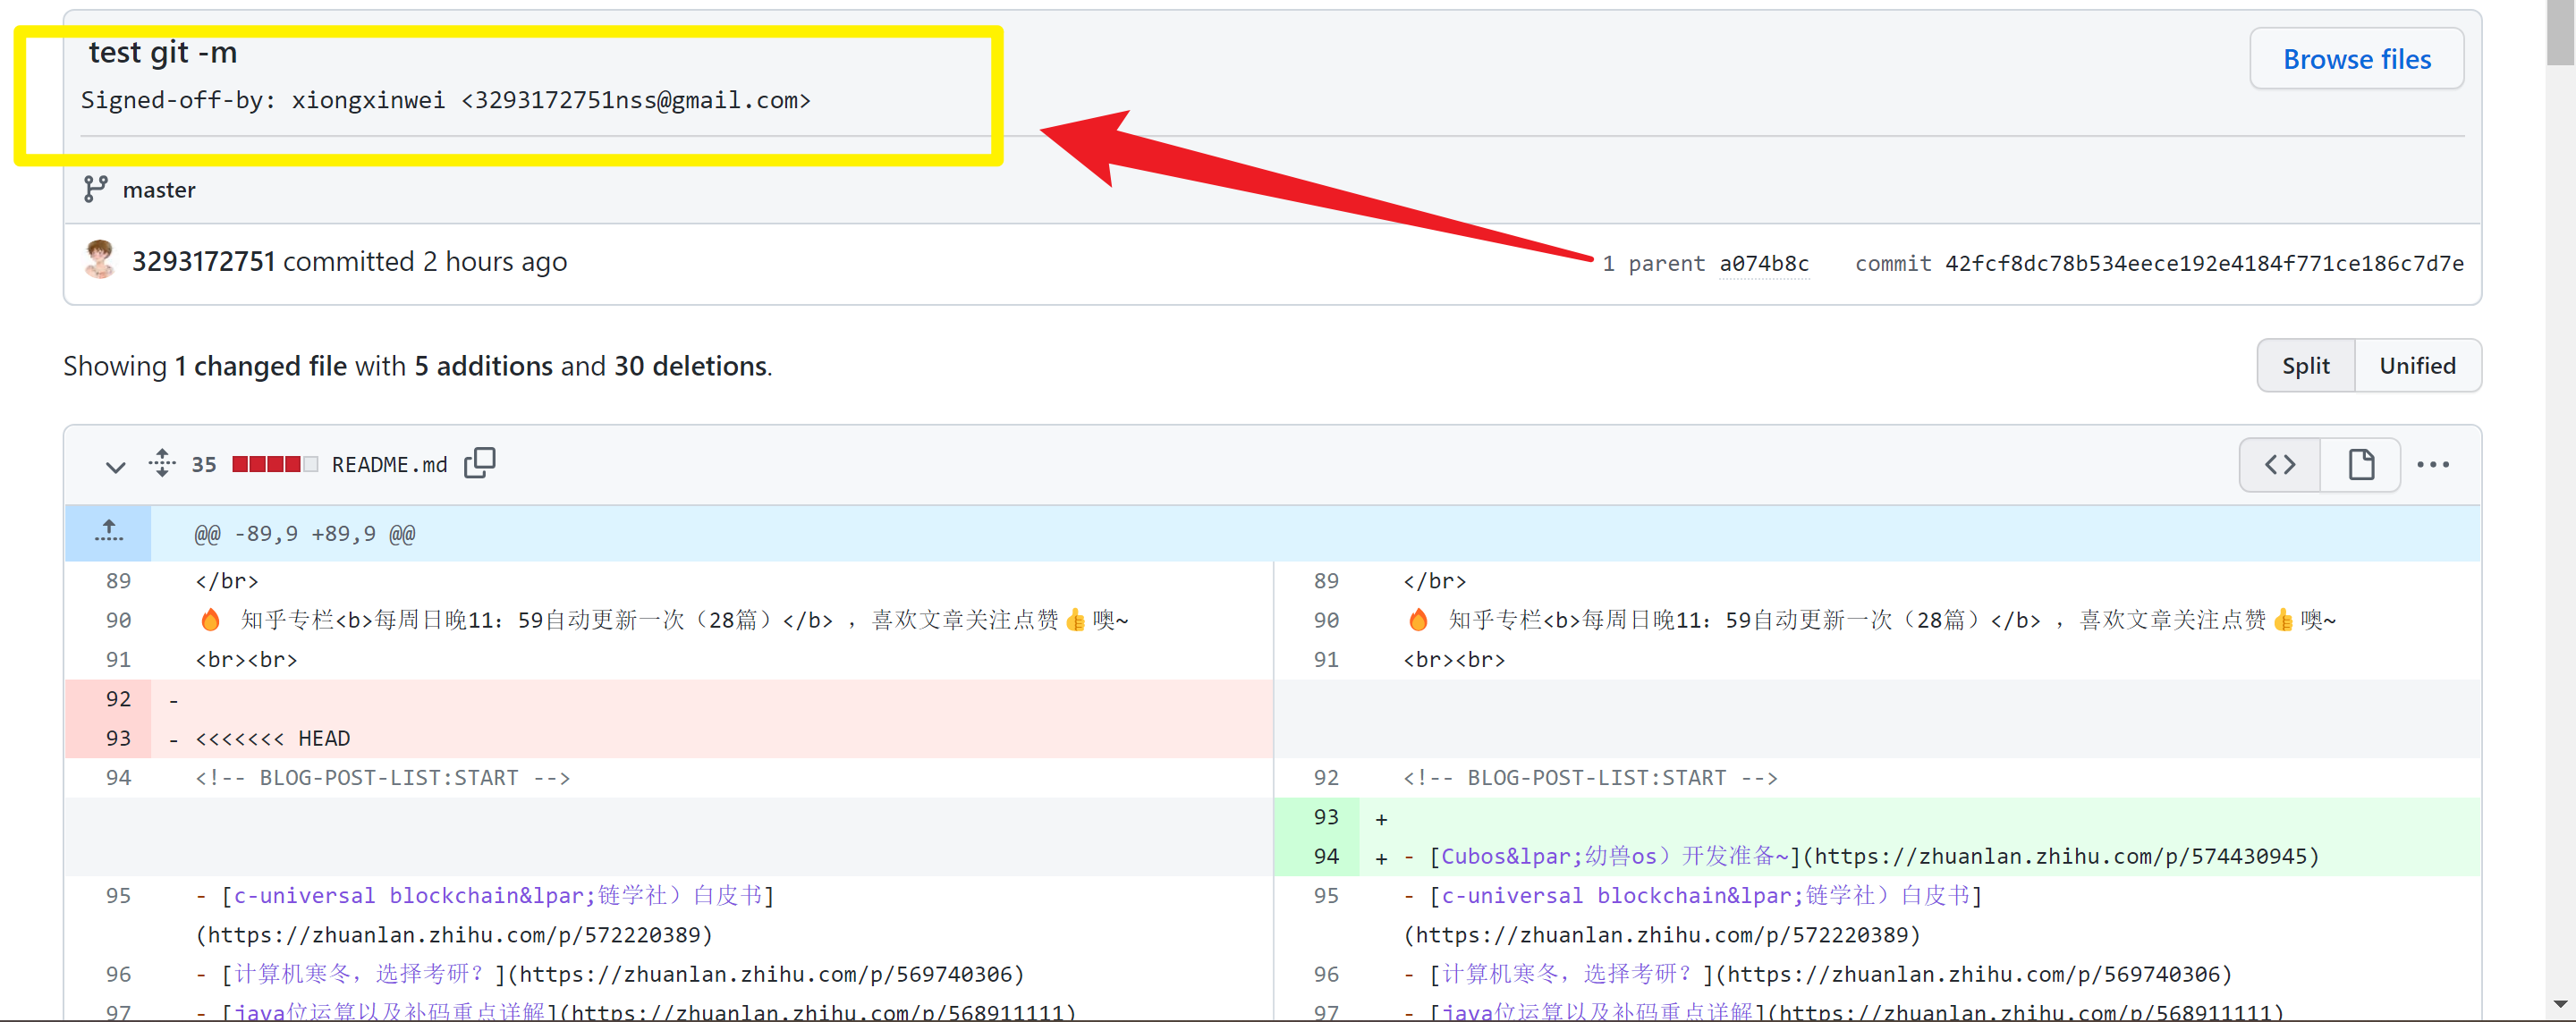
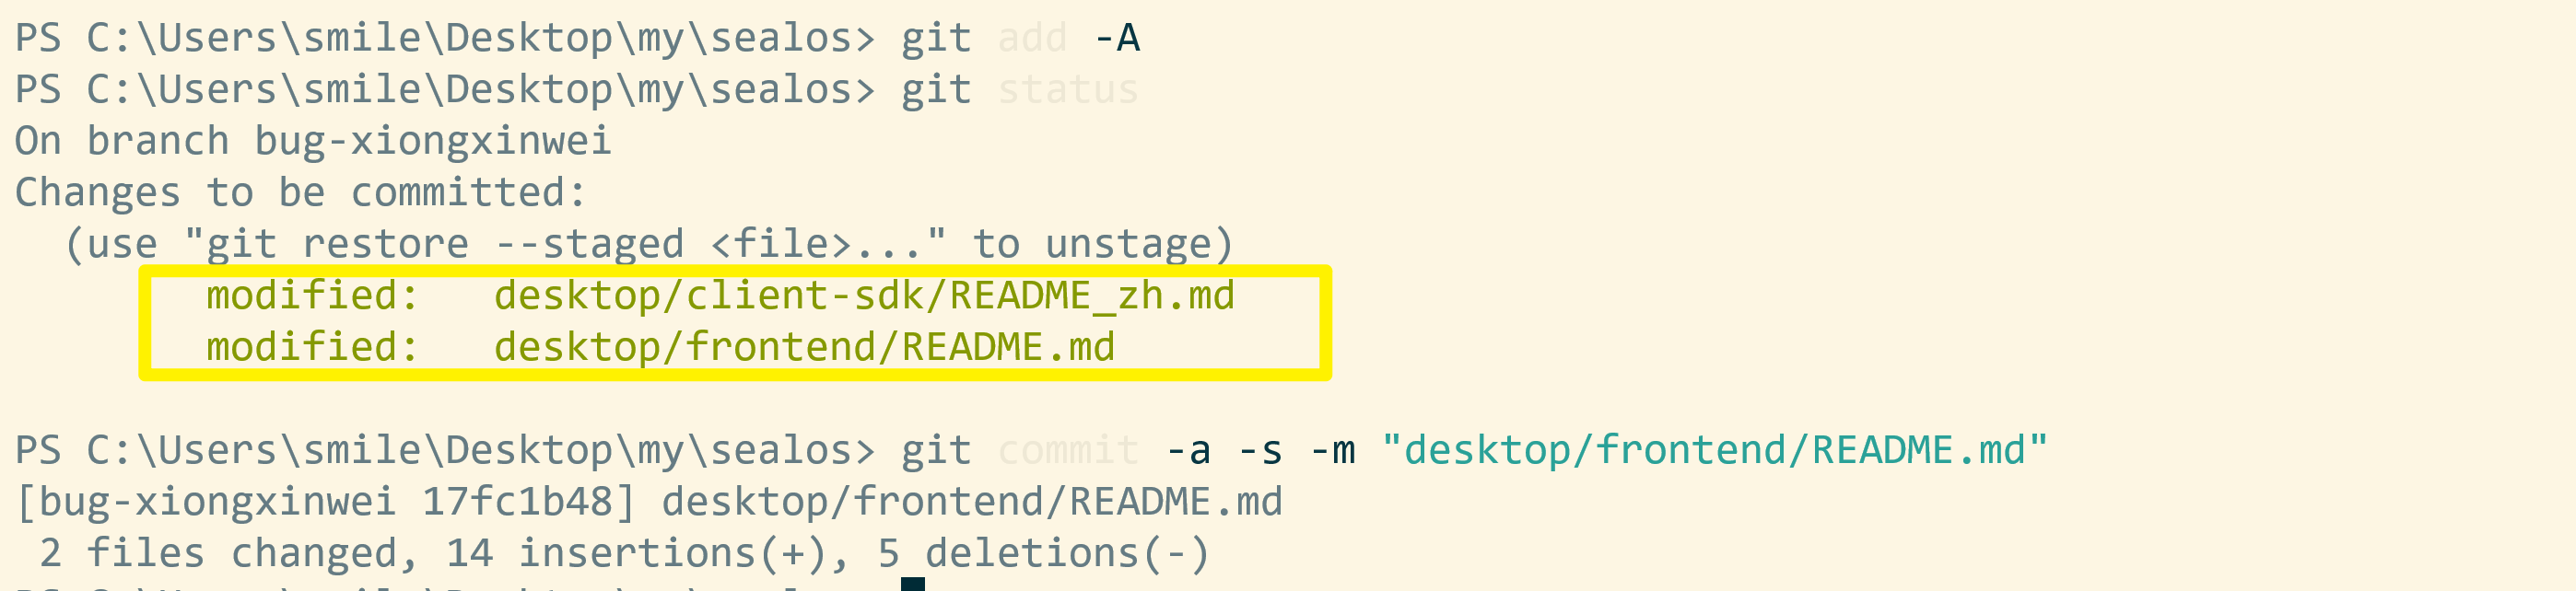
3. Push the branch to the forked repository, trying not to generate multiple commit messages in the PR.
git commit -a -s -m "message for your changes"
-aparameter setting does not need to execute thegit addcommand after modifying the file, just submit it directly-smeans adding a signature and adding your own information
golangci-lint run -c .golangci.yml # lint
git add -A
git commit -a -s -m "message for your changes" # -a is git add ., -s adds a Signed-off-by trailer
git rebase -i <commit-id> # If your PR has multiple submissions
git push # Push to the forked library after rebase is completed. If this is the first push, run git push --set-upstream origin <new-branch>
Specify a language for each Markdown block unless there is no associated language.
If you don’t want to use it, you can use git rebase -i, git commit -s --amend && git push -f
If you develop multiple features in the same branch, you should rebase the master branch:
# create new branch, for example git checkout -b feature/infra
git checkout -b <new branch>
# update some code, feature1
git add -A
git commit -m -s "init infra"
git push # if it's first time push, run git push --set-upstream origin <new-branch>
# then create pull request, and merge
# update some new feature, feature2, rebase main first.
git rebase upstream/main
git commit -m -s "init infra"
# then create pull request, and merge
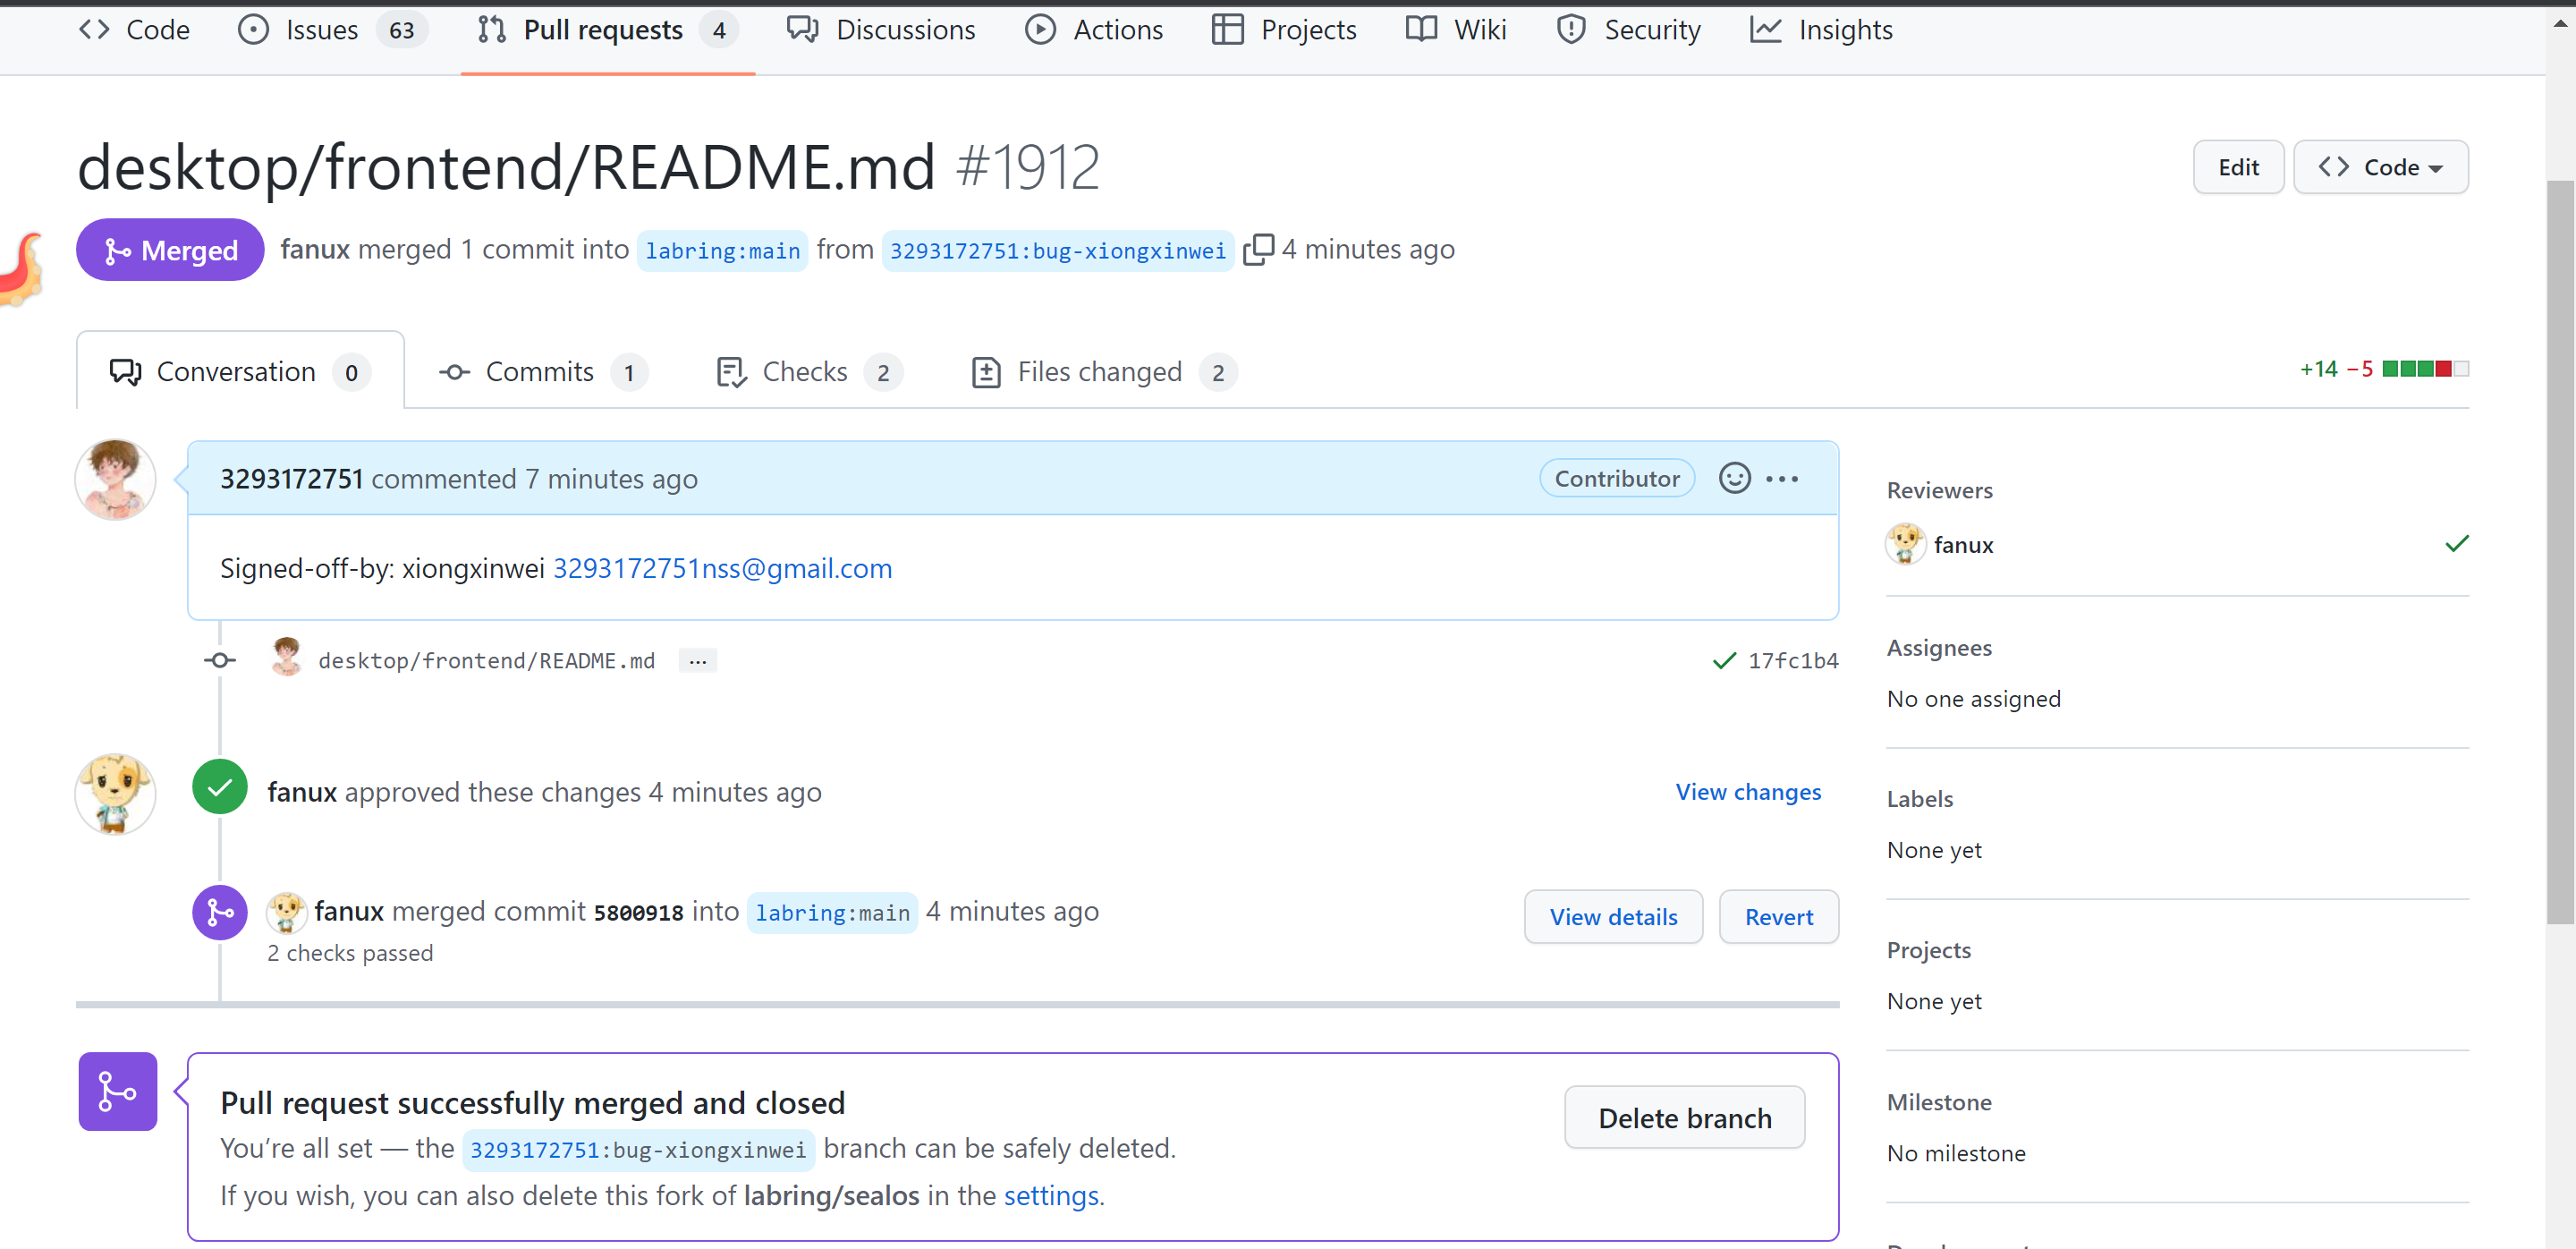
Submit a pull request to the master branch:
Use sealos to quickly build kubernetes
⚠️ Installation notes:
- Requires pure version Linux system
ubuntu16.04,centos7- Use the new version, use the new version instead of the old one
- Server time must be synchronized
- The host name cannot be repeated
- The master node CPU must be 2C or above
- When selecting
ciliumfor the cni component, the kernel version must be no less than 5.4
sealos currently only supports linux and requires a linux server for testing.
Some tools can help you start a virtual machine very conveniently, such as multipass
Build project
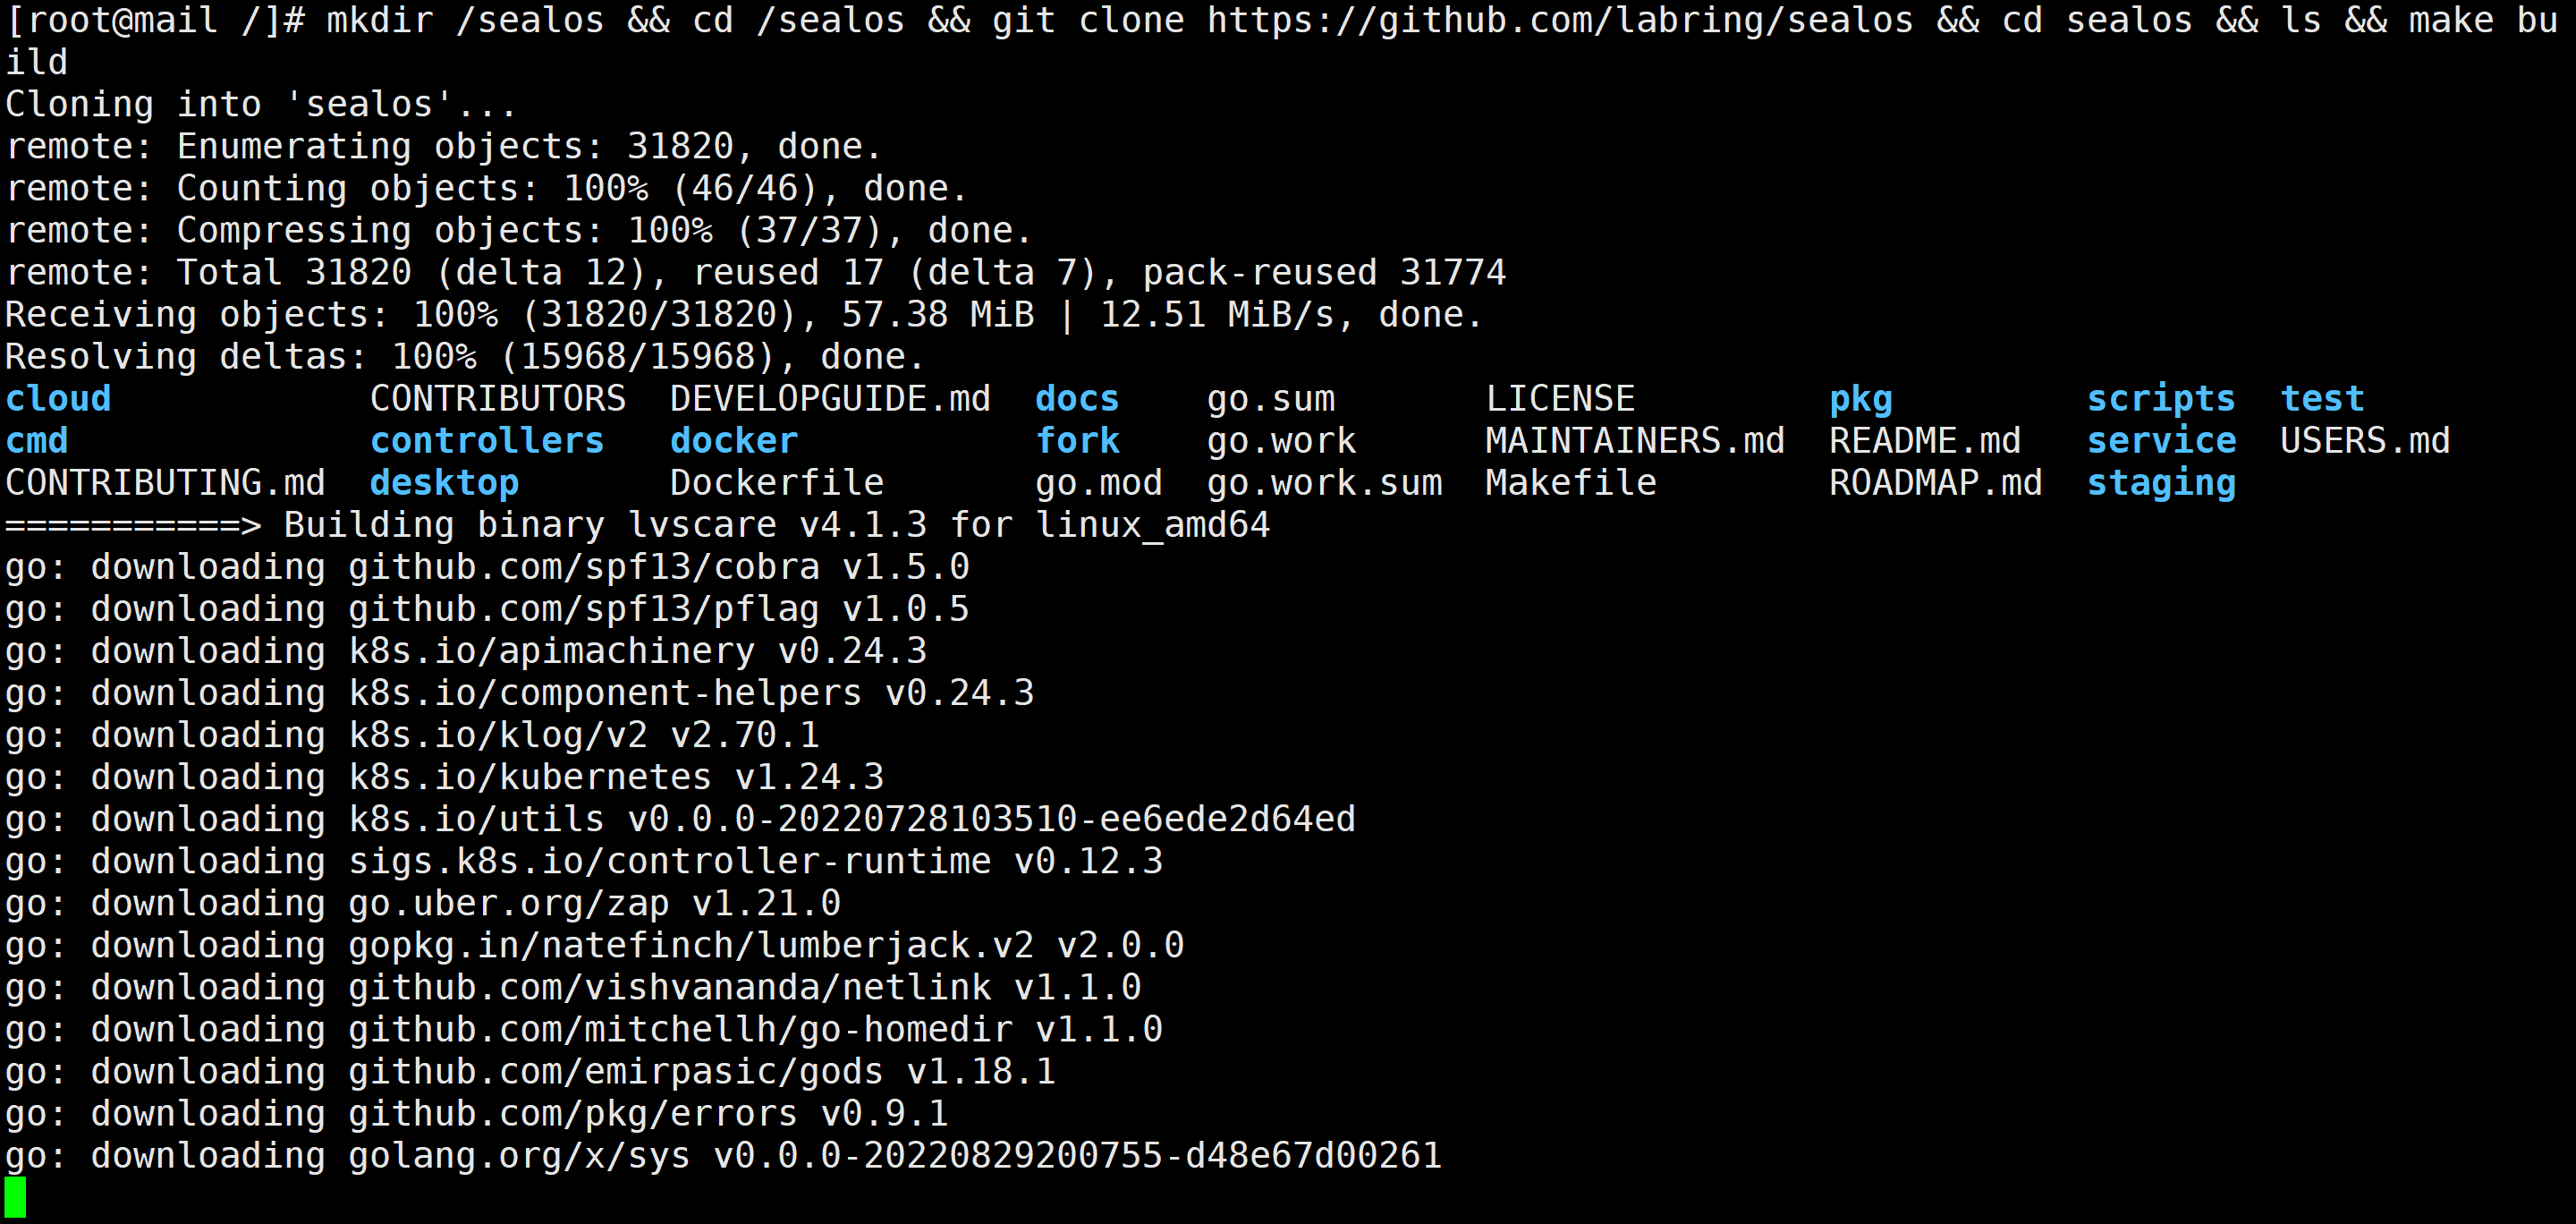
mkdir /sealos && cd /sealos ; git clone https://ghproxy.com/https://github.com/labring/sealos && cd sealos && ls ; make build # It may take a while due to network reasons~
You can scp the bin file to your linux host.
If you use multipaas, you can mount the bin directory to vm:
multipass mount /your-bin-dir <name>[:<path>]
Then test it locally.
**⚠️ NOTE: **
All binaries with
sealoscan be built anywhere as they haveCGO_ENABLED=0. However, support for overriding the driver is required when running somesealossubcommands that depend on CGO.imagestherefore opens CGOsealoswhen building, making it impossible to buildsealosbinaries on platforms other than Linux.
- Both
MakefileandGoReleaserin this project have this setting.Install golang
wget -o https://go.dev/dl/go1.19.3.linux-amd64.tar.gz && tar -C /usr/local -zxvf go1.19.3.linux-amd64.tar.gz
cat >> /etc/profile <<EOF
# set go path
export PATH=\$PATH:/usr/local/go/bin
EOF
source /etc/profile && go version
```

## Build the project

````bash
git clone https://github.com/labring/sealos && cd sealos
go env -w GOPROXY=https://goproxy.cn,direct && make build
```
:::danger custom environment variable mypath root@smile:/usr/local/src# cat /etc/profile.d/mypath
GO language path
export GO_PATH=$"/usr/local/src/go"
path
export PATH=$PATH:$GO_PATH/bin
:::
😂 What I like very much is that sealos can build the environment in one go. I think back then, I really spent all my efforts to build it~ but failed.
remote connection
Pitfalls and solutions encountered
- centos server is not recommended (ubuntu is recommended)
- go version is best
>18
::: tip
- Cloning code is slow, you can use ghproxy:
git clone https://ghproxy.com/https://github.com/labring/sealos - Building the download package is slow, you can use goproxy:
go env -w GOPROXY=https://goproxy.cn,direct && make build cgo: C compiler "x86_64-linux-gnu-gcc" not found: exec: "x86_64-linux-gnu-gcc": executable file not found in $PATHYou need to install gnu-gcc, for example:apt -get install build-essentialoryum -y install gcc-c++-x86_64-linux-gnu
:::
Use sealos to quickly build kubernetes
Add to environment variables
sealoslocation/sealos/*
export PATH=$PATH:/sealos/bin/linux_amd64/
#export PATH=/usr/local/bin:$PATH
//PATH is the variable name, here it means adding it to the PATH environment variable
// =Followed by the environment variables to be added
// :$PATH refers to reassigning the newly added environment variables and the original environment variables to the PATH variable. It can be seen here that if there are multiple environment variables, they should be separated by:, such as
// export PATH=/sealos/bin/linux_amd64/bin:/sealos/bin/linux_amd64/bin:$PATH
// Of course, it doesn't matter whether $PATH is placed at the beginning or at the end.
Environment variables added in this way will take effect immediately, but will become invalid after the window is closed
⬇️ Add global variable method:
vim /etc/profile
// If you only modify the environment variables of the current user, it is `vim ~/.bashrc`
//Add the following code to the last line of the file:
export PATH=$PATH:/sealos/bin/linux_amd64/
//The rules and usage are as mentioned in Article 2
⚔️Quick:
cat >> /etc/profile <<EOF
#set go path
export PATH=\$PATH:/usr/local/go/bin
EOF

echo "source /etc/profile" >> ~/.bashrc #auto update
⚡Verification:
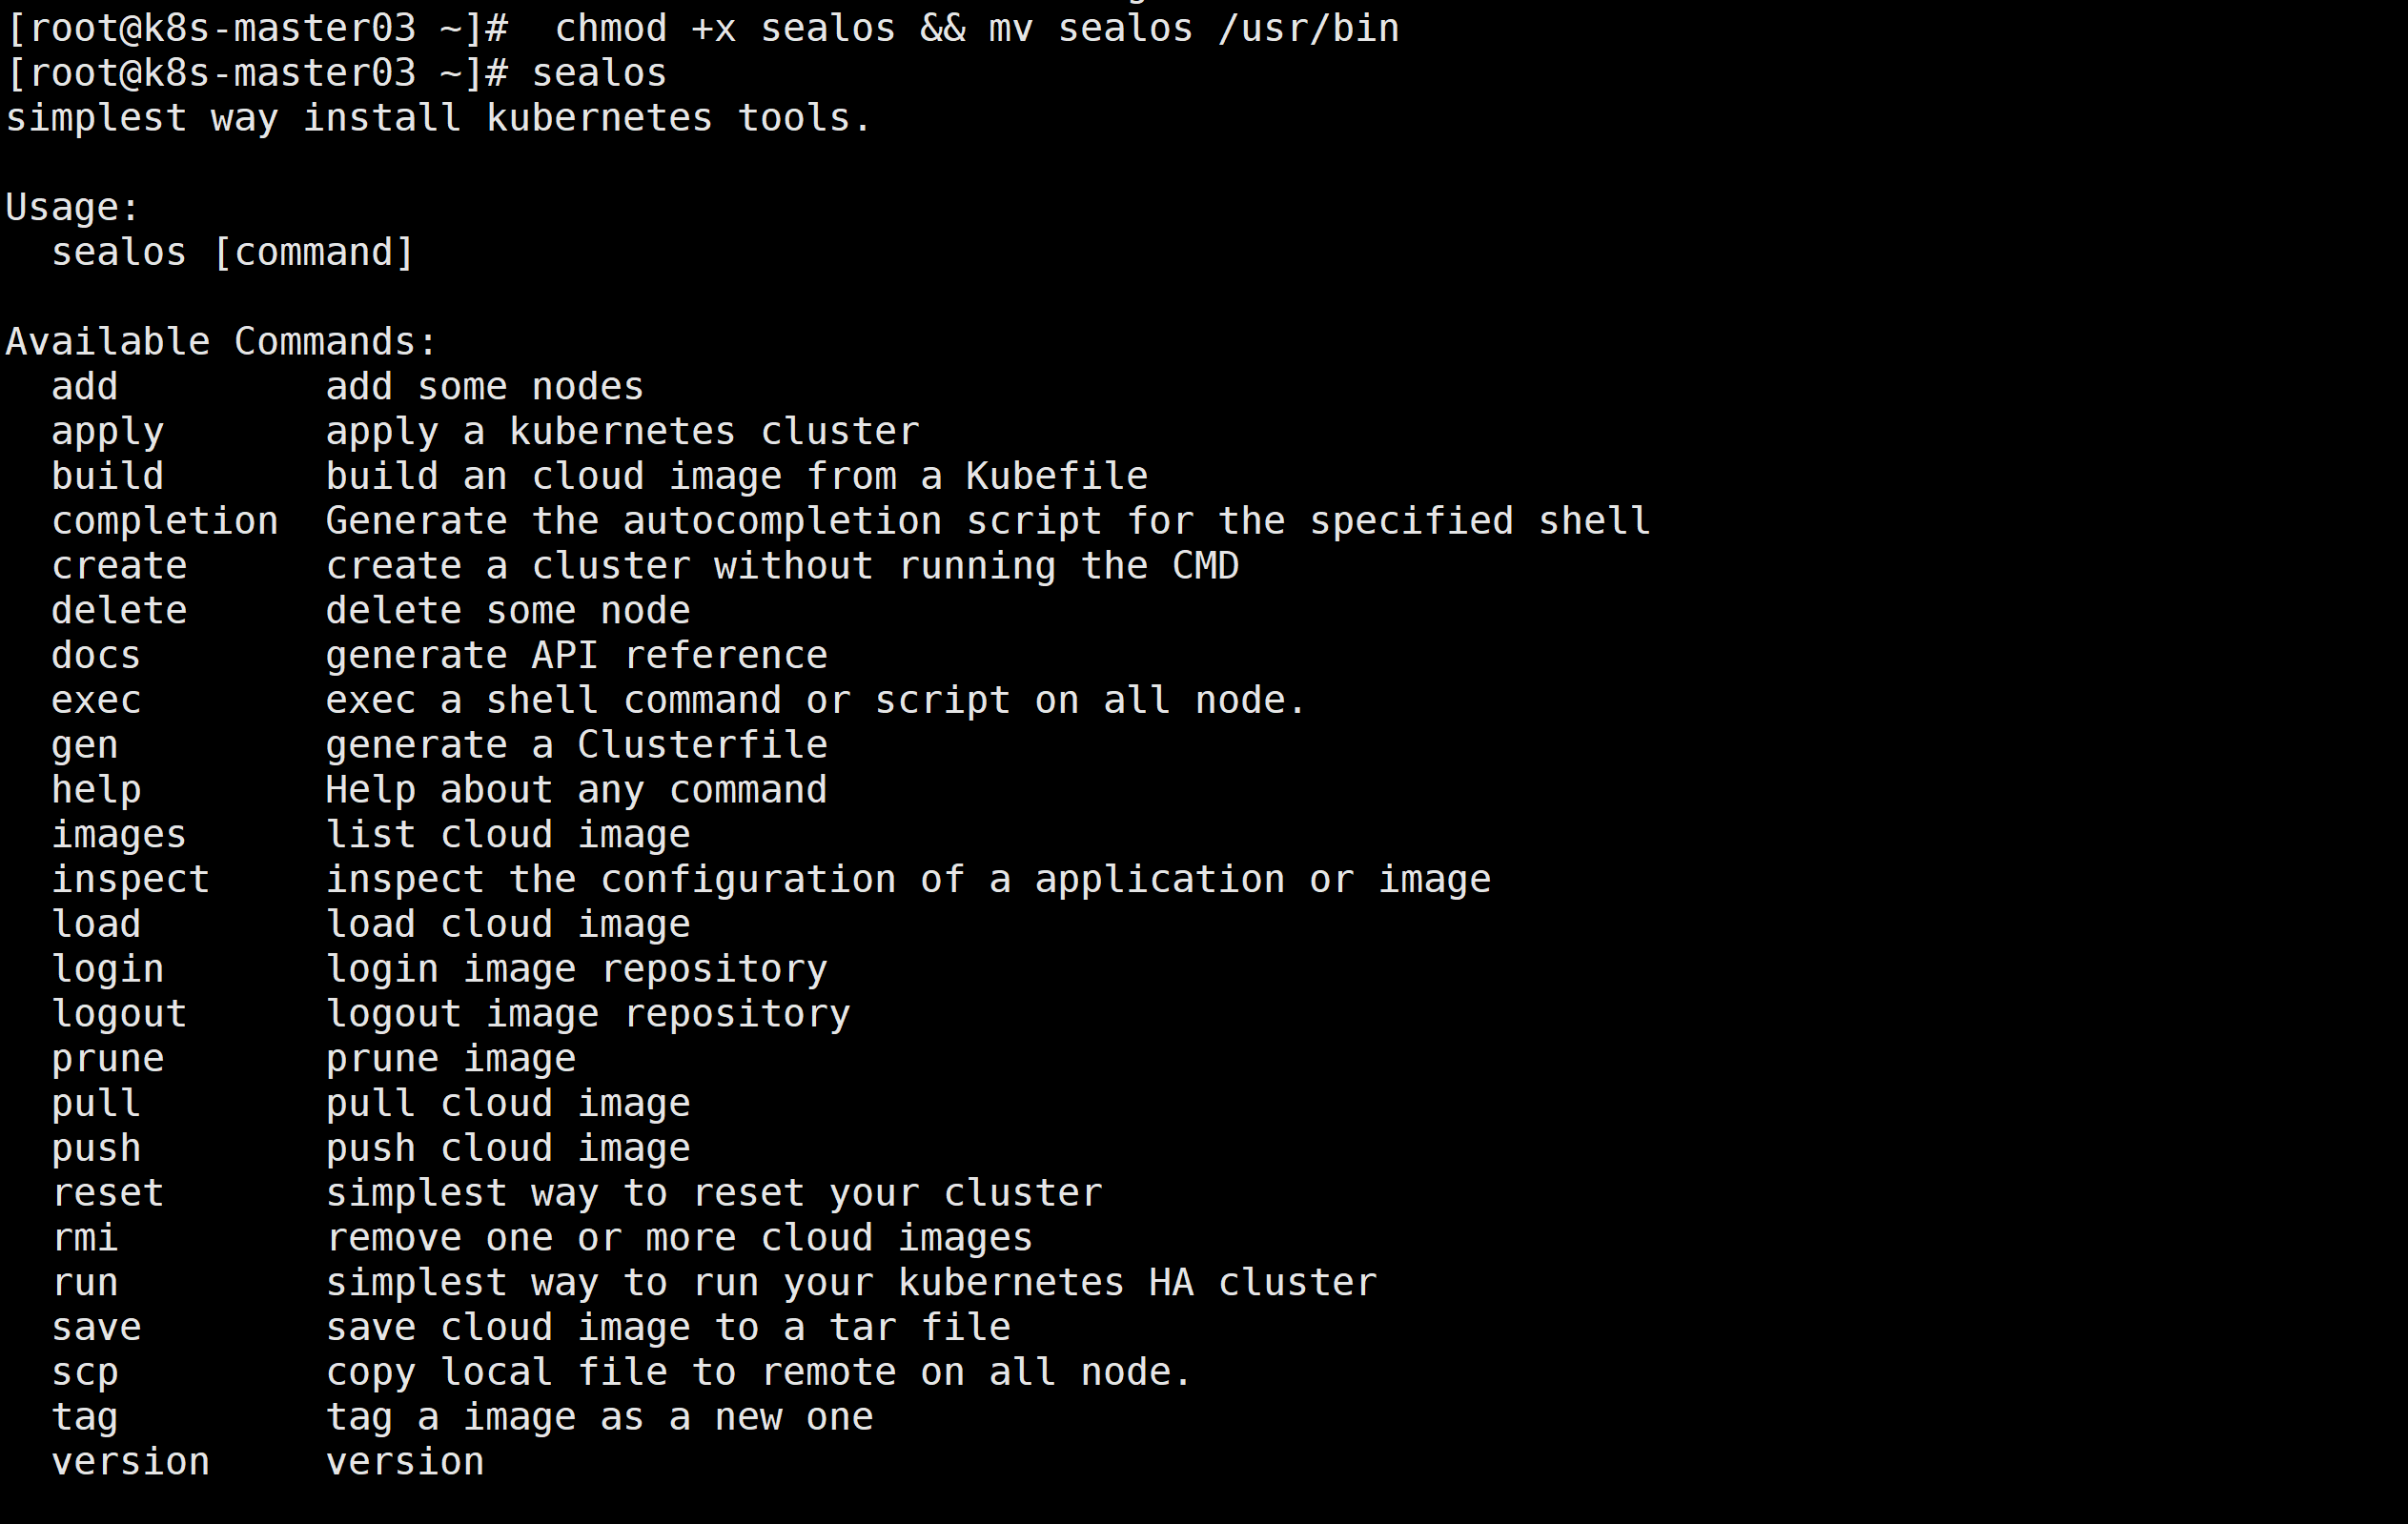
root@VM-4-3-ubuntu:/# sealos version
{"gitVersion":"untagged","gitCommit":"b24684f6","buildDate":"2022-10-20T19:20:05+0800","goVersion":"go1.19.2","compiler":" gc","platform":"linux/amd64"}
root@VM-4-3-ubuntu:/#
k8s introductory documentation
docker, k8s, cloud native notes
Task block
Basic usage:
- Create a
podand understand what apodis ➡️ 🧷Record - Create a
deploymentand understand the relationship betweendeploymentandpod➡️ 🧷Record - Create a
configmapand understand the mounting configuration file topod➡️ 🧷Record - Create a
serviceand accesspodwithin the cluster throughservice➡️ 🧷Record
- Create a
Core concepts and functions of core components:
Kube-proxyis responsible for formulating the forwarding strategy of data packets, and uses daemon mode to monitor thepodinformation of each node in real time and update the forwarding rules. Afterservicereceives the request, it will formulate it according tokube-proxyA good strategy is used to forward requests to achieve load balancing.You can use a
kubectl applyand adeploymentto sort out what these components have done respectively.
::: details core components
kubectl apiserver controller-manager scheduler kubelet kube-proxy etcd
What do these components do?
- I can imagine sealos forming a group after a long time😂
- We have many factories, master factory and node small factory
Node node mainly includes kubelet, kube-proxy module and pod object Master node mainly includes API Server, Scheduler, Controller manager, etcd components
- kubectl is the client that comes with Kubernetes and can be used to directly operate the Kubernetes cluster.
- Api Server is equivalent to the master’s secretary. All communication between master and node needs to go through Api Server.
- Controller-manager is the boss and the company’s decision-maker. He is responsible for the management of resource objects such as Node, Namespace, Service, Token, and Replication in the cluster, so as to maintain the resource objects in the cluster in the expected working state.
- The scheduler is the scheduler. If our small factory cannot produce something, the scheduler needs to be responsible for scheduling the resources within the cluster, which is equivalent to the “scheduling room”.
- kubelet is the director of the small factory, controlling each node
- The kubelet component monitors the pod binding events generated by kube-scheduler through the interface provided by api-server, then obtains the pod list from etcd, downloads the image and starts the container.
- Monitor the pods assigned to the Node node at the same time, periodically obtain the container status, and thenNotify various components through api-server.
- kube-proxy is easy to understand. It is equivalent to the concierge of each factory under sealos. The group may not know which resource is in which factory, but the concierge definitely knows, so the kube-proxy of each node is connected.
:::
**what is pod? **
Pod is the smallest scheduling unit in Kubernetes. A Pod encapsulates a container (or multiple containers). Containers in a Pod share storage, network, etc. That is, you can think of the entire pod as a virtual machine, and then each container is equivalent to a process running on the virtual machine. All containers in the same pod are scheduled and scheduled uniformly.
When applications are deployed in
Kubernetes, they are scheduled inpods, which are basically packages or houses of a single container. In a sense, a container of containers.podis a logical packaging entity for executing containers on aK8scluster. Think of each pod as a transparent wrapper that provides a slot for the container.podis the smallest deployable unit ofKubernetes. A pod is a group of one or more containers with shared storage/network resources, and a specification for how to run the containers. So, in the simplest terms, a pod is the mechanism by which a container is “used” in Kubernetes.
Pod is the smallest unit of k8s. Containers are included in pods. There is a pause container and several business containers in a pod, and the container is a separate container. In short, a pod is a collection of containers.
Pod is equivalent to a logical host, each pod has its own IP address
Containers in the pod share the same IP and port
By default, each container’s file system is completely isolated from other containers
#Create a pod named nginx-learn and expose the container port to 80.
root@VM-4-3-ubuntu:/# kubectl get node -A
root@VM-4-3-ubuntu:/# kubectl run nginx-learn --image=nginx:latest --image-pull-policy='IfNotPresent' --port=80
pod/nginx-learn created
root@VM-4-3-ubuntu:/# kubectl get node -A
NAME STATUS ROLES AGE VERSION
vm-4-3-ubuntu Ready control-plane 24h v1.25.0
root@VM-4-3-ubuntu:/# kubectl get pod
NAME READY STATUS RESTARTS AGE
nginx-learn 1/1 Running 0 58s
delect the pod:
root@VM-4-3-ubuntu:/# kubectl get pod
NAME READY STATUS RESTARTS AGE
nginx-learn 1/1 Running 0 58s
root@VM-4-3-ubuntu:/# kubectl delete pod nginx-learn
pod "nginx-learn" deleted
root@VM-4-3-ubuntu:/# kubectl get pod
No resources found in default namespace.
kubectl creates and deletes a pod related operations:
| Command | Description |
|---|---|
| run | Run a pod on the cluster |
| create | Create a pod using a file or standard input |
| delete | Use a file or standard input to delete a pod |
create deployment:
Pod is a single or a collection of containers
Pod is the smallest scheduling unit of k8s. There can be multiple containers in a Pod, sharing the network with each other, etc. This is the core concept of k8s.
deployment is a pod version management tool used to distinguish different versions of pods
From a developer’s perspective, deployment means deployment. For the complete application deployment process, in addition to running the code (that is, pod), it is necessary to consider the update strategy, number of copies, rollback, restart and other steps.
Deployment, StatefulSet is the Controller, ensuring that the Pod is always running in the state you need.
There are one-time ones called jobs, those that are executed regularly are called crontabjobs, and those that are scheduled are called sts.
kubectl run nginx --image=nginx --replicas=2
nginx: Application name
--replicas: Specify the number of pod replicas running in the application
--image: the image used (pulled from dockerhub by default)
kubectl get deployment or kubectl get deploy
View replicaset:
kubectl get replicaset or kubectl get rs
View pod:
kubectl get pods -o wide
create configMap:
ConfigMap can be created using kubectl create configmap or the ConfigMap generator in kustomization.yaml
kubectl create configmap <map name> <data source>
Where <map name> is the name specified for the ConfigMap and <data source> is the directory, file or literal value from which data is to be extracted. The name of the ConfigMap object must be a legal DNS subdomain name.
Multiple nodes
sealos currently only supports Linux and requires a Linux server for testing.
Some tools can help you start a virtual machine very conveniently, such as multipass
Build project
mkdir /sealos && cd /sealos && git clone https://github.com/labring/sealos && cd sealos && ls && make build # It may take a while due to network reasons~
You can scp the bin file to your linux host.
If you use multipaas, you can mount the bin directory to vm:
multipass mount /your-bin-dir <name>[:<path>]
Then test it locally.
**⚠️ NOTE: **
All binaries with
sealoscan be built anywhere as they haveCGO_ENABLED=0. However, support for overriding the driver is required when running somesealossubcommands that depend on CGO.imagestherefore opens CGOsealoswhen building, making it impossible to buildsealosbinaries on platforms other than Linux.
- Both
MakefileandGoReleaserin this project have this setting.
😂 What I like very much is that sealos can build the environment in one go. I think back then, I really spent all my efforts to build it~ but failed.
Quick start of core services
💡 Delete all the clusters from yesterday and open three new servers, completely new~

Environment preparation
⚠️ Note: The environment must be very important, otherwise you won’t be able to run~
hostnamectl set-hostname k8s-master01
hostnamectl set-hostname k8s-master02
hostnamectl set-hostname k8s-master03
The virtual machine needs to be configured with a static IP
Check the kernel version
# Download and install sealos. sealos is a golang binary tool. You can directly download and copy it to the bin directory. You can also download it from the release page.
yum install wget && yum install tar &&\
wget https://github.com/labring/sealos/releases/download/v4.1.3/sealos_4.1.3_linux_amd64.tar.gz && \
tar -zxvf sealos_4.1.3_linux_amd64.tar.gz sealos && chmod +x sealos && mv sealos /usr/bin
#Create a cluster
sealos run labring/kubernetes:v1.25.0 labring/helm:v3.8.2 labring/calico:v3.24.1 \
      --masters 192.168.0.2,192.168.0.3\
      --nodes 192.168.0.4 -p [your-ssh-passwd]
-p: passwd passwordTurning on ssh password-free does not require a password, it is implemented here.

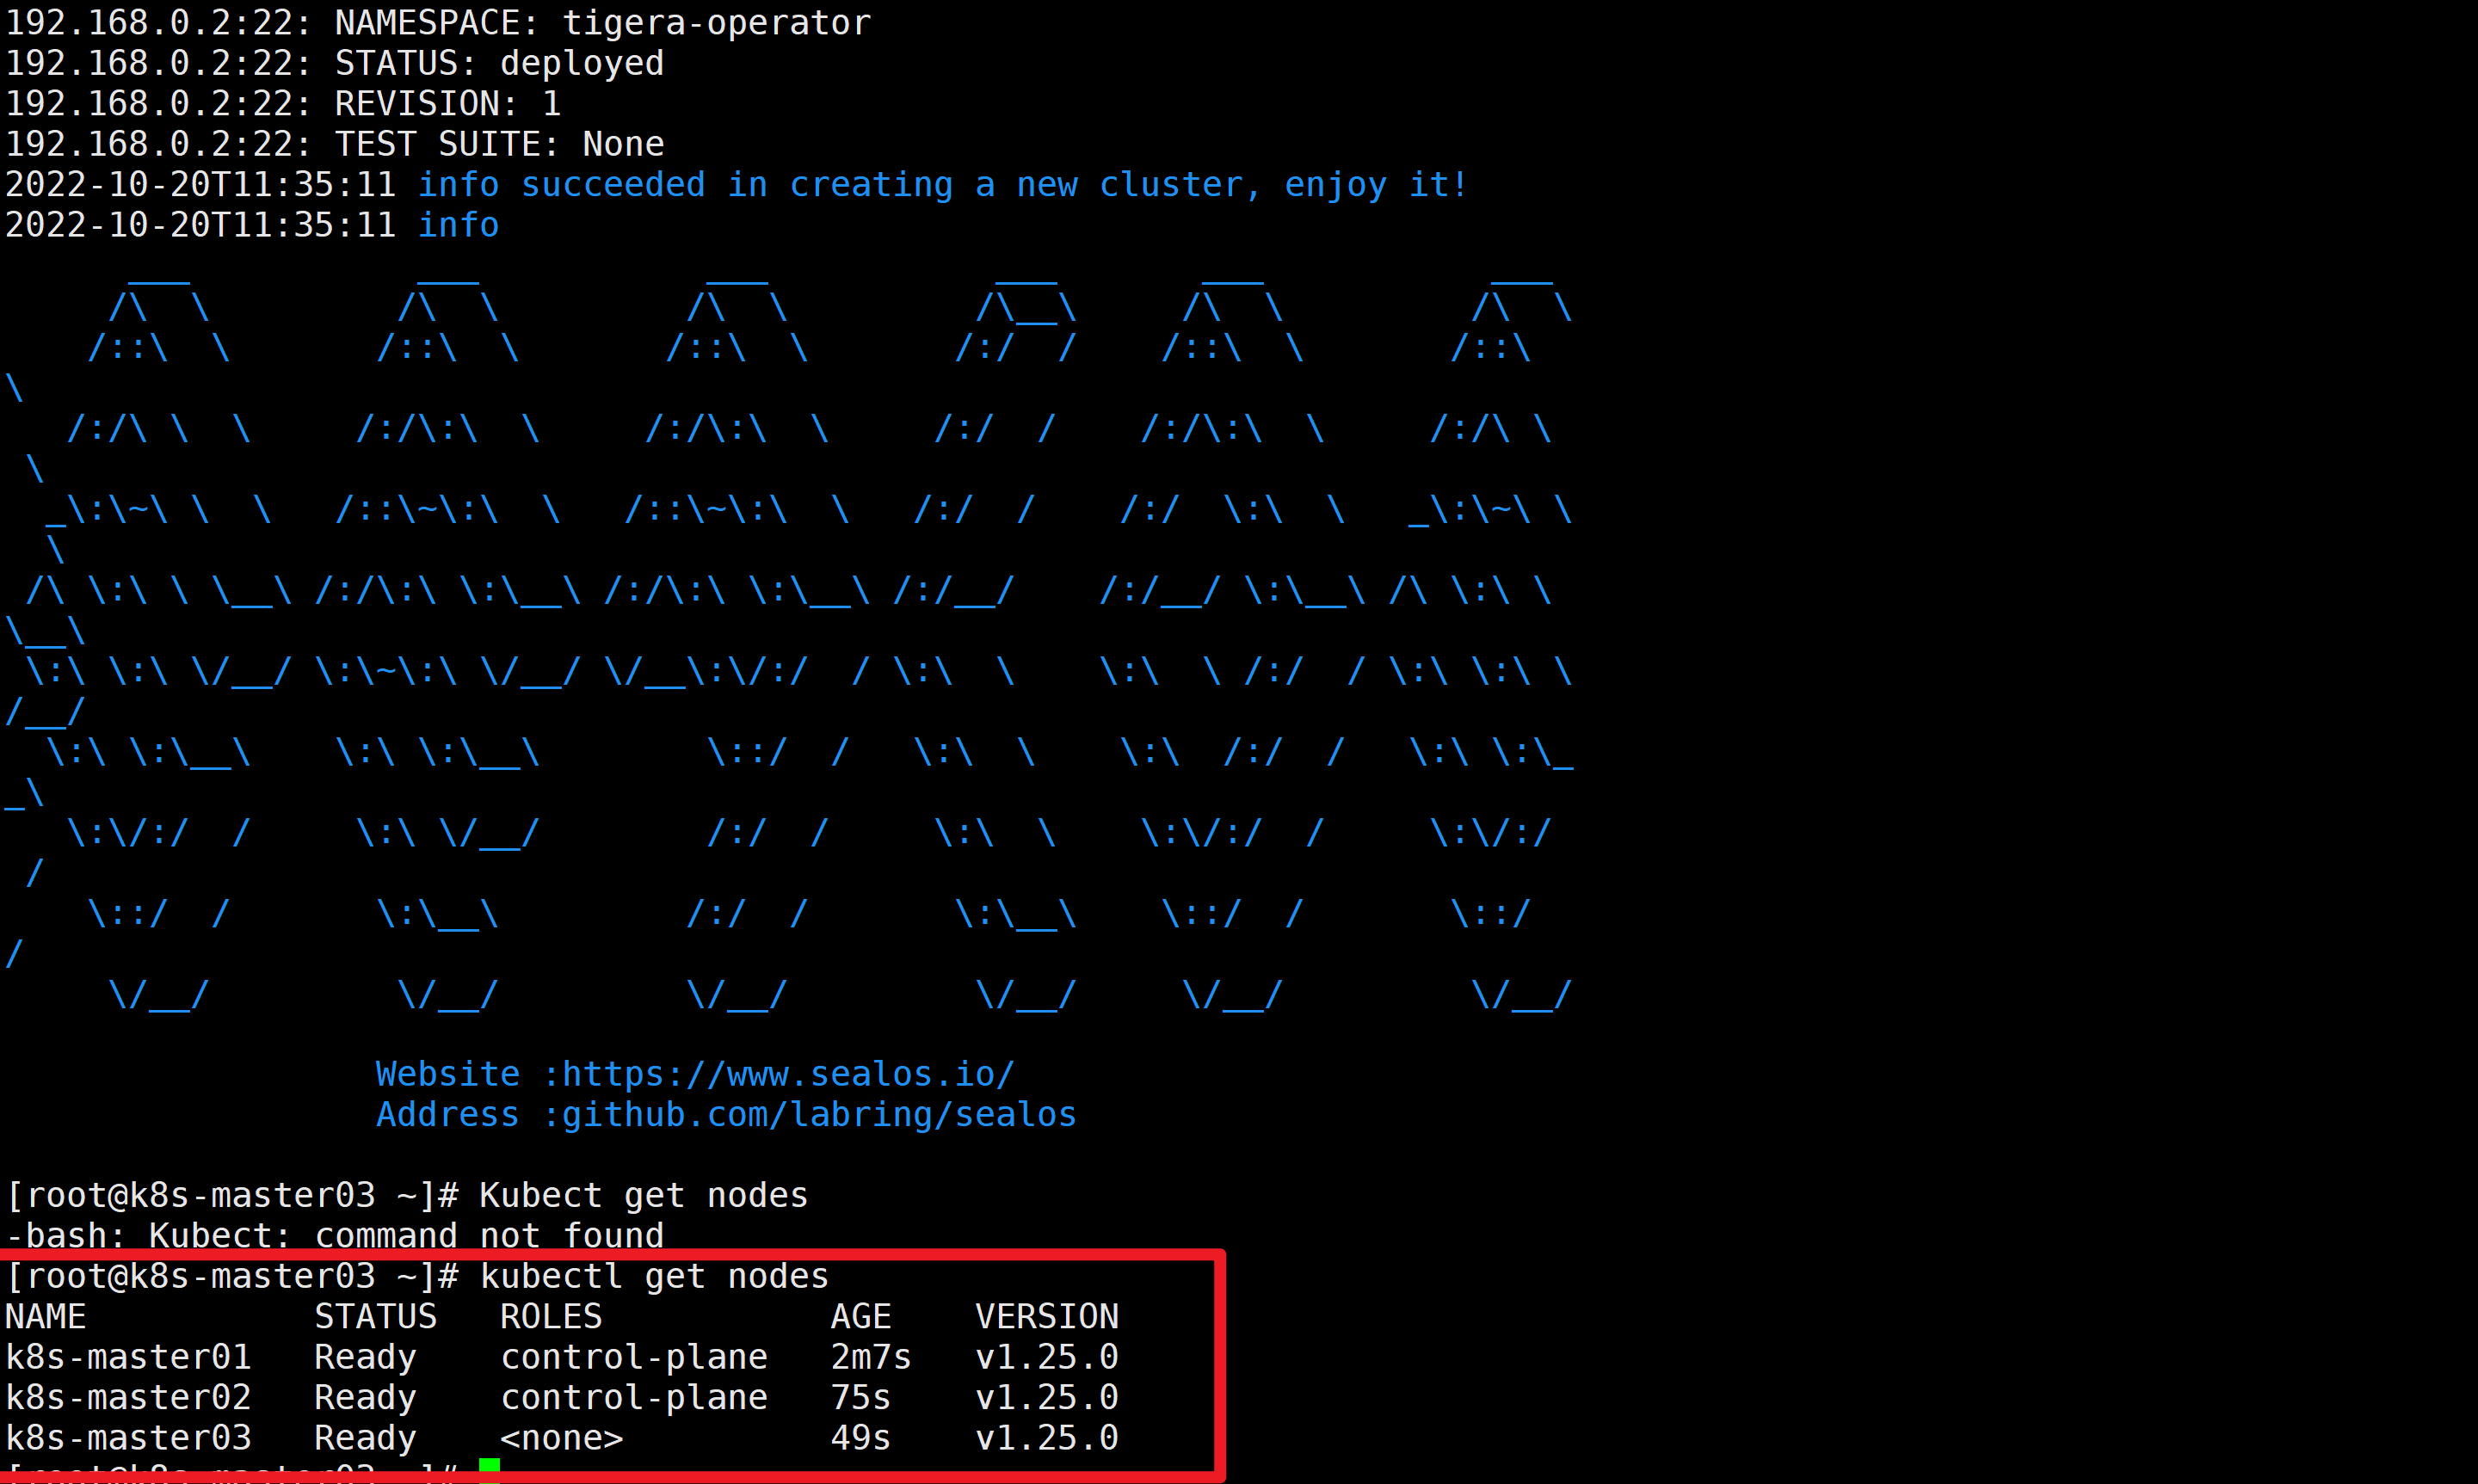
验证集群:
kubectl get nodes
单节点
Single host
- You can use
multipassto start multiple virtual machines from one machine- Recent releases also support the ——
Singlemode single-machine deployment
$ sealos run labring/kubernetes:v1.25.0 labring/helm:v3.8.2 labring/calico:v3.24.1 --single
# remove taint
$ kubectl taint node --all node-role.kubernetes.io/control-plane-
 branch